
 I have been waiting for a garden shed for a long time and it is now a reality. If you have read Grow a Sustainable Diet, you know that we intended to start on it as soon as that book was off to the publisher. Well, life got in the way, including writing another book (Seed Libraries), but it is done now—or mostly done. The door is yet to be built. The shed is 8’ x 8’ with the side walls 7’ high and about 12’ to the peak. My wonderful husband, Walt, was the builder, designing it to my wishes. Our daughter and son-in-law, Betsy and Chris, supplied the lumber, harvested from their property and cut to our specifications on their Wood-Mizer. The framing is oak and the siding is pine.
I wanted a solid floor with a foundation so we dug trenches for the footings, which promptly filled with water and stayed that way over the winter while the water table was high. Once the foundations walls were in, the floor was dug out and leveled. A layer of gravel went in, followed by sand and tamping. Everything was carefully measured to ensure the floor would be level with the door opening in the foundation wall once the pavers went in. The pavers had been diverted to our place a few years ago, rather than being hauled to the landfill at the end of a construction job. Even though they each had a piece taken off, I was sure I could put them to good use.
 Walt did most of the work on the shed, while I was the extra set of hands when needed. But, since the floor was my idea, I was the one on my knees fitting everything into place. We rented a wet saw from Home Depot for this job. I decided how things would go together and Walt operated the saw, trimming each paver to fit. It was a lot of work, but made for a great floor! We swept fine sand into the cracks between the pavers. Once the roof went on and things were very dry, we used a polymer product that son Jarod (who knows about those things) gave us to sweep into the cracks as a finish. It was important that we do it when everything was dry.
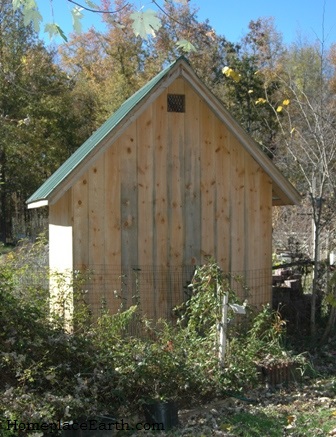
 Last winter Walt finished the framing and put on the metal roof. The framing is patterned after the old chicken house that is on our property. This garden shed is going to be here for a long time. Since it was for storage, I didn’t want to waste wall space with a window. All the light I need comes in through the door and the openings at the peak on both ends. Those peak openings are covered with expanded metal to keep birds out, while allowing ventilation. As anticipated, small spaces opened up between the siding boards as they dried. Rather than cover them with battens, we left them as is. I like the bit of added ventilation.
 The pine siding is about 8” wide and runs the entire height needed for each piece, which is a perk of having lumber cut to order. That width was convenient to cut from the trees available. I moved in this spring before the siding was complete. As I used tools, gathered from their previous homes on our property, I put them in the garden shed. The rafters are 2’ apart. I put nails in them to hang things, such as garlic, onions, bags of cowpeas, etc, but reserved a space for a loft in the back two feet of the shed. Anxious to use the loft, I found two old 2 x 2’s salvaged from an old chicken tractor years ago. They just fit the space from one end to the other. I had some old wooden flats that I no longer use, since I start most things in the cold frames, so I put them up there as the loft floor to see how it would look. So far, that’s my loft. Nothing is nailed down, but it works for what I’m using it for. I can store harvest baskets and other containers and shade cloth there. My solar oven spends the summer in the garden and will now spend winters in the garden shed loft.
 When I step into the shed, immediately to my left I have hung the tools I use often—my fork, cultivator, and spade. I’ve found that hanging them up, rather than leaning them in the corner, as I did when they were stored in the garage, encourages me to keep them clean. As a result, I now keep a wire brush handy to scrape mud off the ends of these tools, as well as off my trowel, Cobrahead, and soil knife.
 Just to the right, as I step into the shed, are other important tools at my disposal—my Cobrahead, sickle, scale, and measuring tape. When the door is finished I plan to hang the Cobrahead and sickle on it so that when the door is open, they will be even more accessible as I pass by. You can see that I have added corner shelves here. That was a design that evolved with the shed. My original plan called for a counter/workbench along that whole wall. However, I realized that I could use scraps from the siding to make corner shelves and I like that better. The shelf boards rest on the framing pieces already there.
 Taking the place of the built-in counter/workbench is this workstation I built from scraps on hand, including an old broken door. It is great to have a space to put my clipboard on, make notes, and sort seeds.The panels on the workstation are painted with blackboard paint. Soil amendments and odds and ends are on the shelves in that back corner.
 Here you can see some of my garlic and the vent opening in the eave above the shed doorway. Garlic and onions have been hanging there since they were harvested, but will now go under the house where I have nails in the joists in the crawl space for winter storage. If you look closely on that siding you will see a wire sculpture I’ve put up there just above the door. It was an old art project by son Travis that has outlived its usefulness in the house. I’m sure I’ll find some more fun stuff to put up there. As always, click on any picture and it will open in a new window for a better view.

Originally I had thought I’d make the shed 6’ x 6’ and am glad I let Walt talk me into going with 8’ x 8’. There is plenty of room for storage, plus room for me to be comfortable using the workstation. After everything you’ve seen, I’ve got this much floor space left. I have since put the smaller of my two solar food dryers there for the winter and I still have space to move around. The small stepstool is just right for reaching the loft. Currently I use an old 2 x 2 with a screw sticking out of it (found it in the barn) to hang things on the nails in the rafters. Son Luke is carving a cedar pole for me, specially made for that job.
I love this shed! If you are planning a shed of your own, write a plan for what you want it to do for you. Although it wasn’t the case for me, it might be that there is a shed that fits your needs sitting in the parking lot of a big box store, waiting to be delivered to your yard. I had been thinking of everything I wanted in a shed for a long time and it was worth the wait. There is still more to come. A door of course, and we’ll be adding gutters and a water barrel or two, and maybe attaching things to the outside. I’ll probably paint it next summer. It has been wonderful using it this summer. I hope I’ve given you some good ideas to put to use in your garden shed![]() .
.


