Feeds:
Posts
Comments

Archive for the ‘low tunnel’ Category

bean-seedlings-blogIf you are new to vegetable gardening, or even if you are an experienced gardener who has moved to a new climate, it may be hard to decide when to plant. It is easy to make a list of what you want in your garden, but when to put the seeds or transplants in the ground is the conundrum. There are many things to consider, but the most important is to know the average first and last frost dates for the area you are considering. If you have been keeping temperature records, that’s great! However, not many are that diligent. Not to worry, others have that information available for you. I am sure you could find it through the weather service or your local Cooperative Extension Service, but I’ve found that a quick way to get temperature and precipitation information is through plantmaps.com. The amount of annual rainfall is important, also.

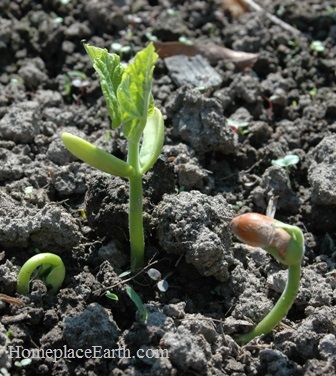
Seed catalogs are a great help when deciding plant dates. At the beginning of each crop section in the catalog there is generally an information box that will guide you on planting. It might indicate that you should wait until after the last spring frost to plant a particular crop, but start the seeds about six weeks before you expect to put the transplants in the ground. So, count back six weeks from the date you have chosen to indicate your last expected frost and you know when to start the seeds in your house or in your coldframe. At the resource page of my website you can download a free Plant / Harvest Schedule to help you with your planning. You fill in your own crops and dates. p-h-sample-garden-w-cover-crops-blog

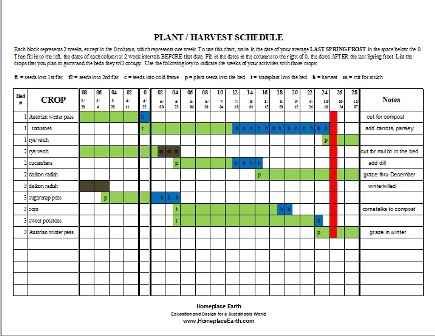
More confusing is when the planting information directs you to plant as soon as the soil can be worked. In that case I would look to what the soil temperature should be and the seed catalogs will indicate that.  FYI, the soil temperature is generally about 60° around the date of your last expected frost in the spring. Find more information at my post How Important is Soil Temperature. You can use a compost thermometer or a household kitchen thermometer to take the temperature of your soil several inches deep.

2017-catalogs-blog
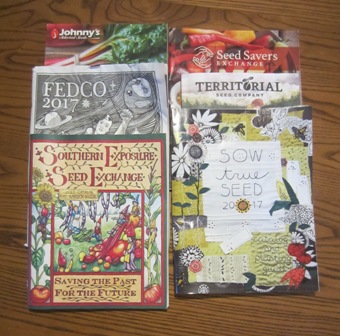
The catalogs I have are Southern Exposure Seed Exchange (Virginia and local to me), Sow True Seed (North Carolina), Fedco (Maine), Johnny’s (Maine), High Mowing (Vermont), Seed Savers Exchange (Iowa), Territorial (Oregon), and Bountiful Gardens (California). I like to source my seeds as close to home as possible, but sometimes there are items or varieties that are available further away that I seek out.

It is good to have an overall reference book in your home library that you can consult for growing information for specific crops. In my early gardening days I was given a copy of How to Grow Vegetables and Fruits by the Organic Method edited by J.I. Rodale and the staff at Rodale Books. I still look to that when I have questions about a crop. In fact, I wore the binding out on my first copy and now use a copy I found in good condition at a used book store. A more recent book that is a terrific reference and one I turn to, also, is Pam Dawling’s Sustainable Market Farming. Pam is growing in the mid-Atlantic region but much of her information is applicable to a wider geographical area. You can find books specific to your region. Ira Wallace, of Southern Exposure Seed Exchange, authored The Timber Press Guide to Vegetable Gardening in the Southeast. Timber Press has published growing guides for seven regions of the U.S.

Here in Virginia, some crops, such as kale, can be planted in both the early spring and in the fall. It is too hot for these crops in mid-summer. My main crop of kale is planted in late summer for a fall and winter harvest. About March, as the days begin to warm up, overwintered kale will bolt, meaning it will send up a seed stalk that will flower and, if left alone, will produce seeds. Generally you would clear out those plants to make room for spring and summer crops, unless you plan on saving seeds. Seeds for my spring crop of kale will go into the coldframe sometime in late February, to be planted out in the garden when the seedlings are big enough—late March or early April.

A friend recently asked about growing in North Dakota, specifically at the Standing Rock Indian Reservation. She will be visiting there in late July and wanted gardening information. According to plantmaps.com, the last spring frost there is the first week of May and the first fall frost is late September.  I consulted The Old Farmer’s Almanac gardening calendar at http://www.almanac.com/gardening/planting-dates/states and found that when she gets there it will be time to plant lettuce, radish, spinach, and Swiss chard for a fall harvest.

In Zone 7 we can harvest lettuce until about Christmas and kale and collards all winter under a single layer row cover. The temperature rarely dips into the single digits, and then not for long. According to plantmaps.com, at Standing Rock in Zone 4b the temperature could go as low as minus 25°. Only the most cold hardy of greens could survive, and then with multiple layers of cover. It is important to research what varieties would do best under those conditions. For extended fall planting and harvesting times under rowcovers, consult Table 16 pages 205-207, in Eliot Coleman’s Four Season Harvest, 2nd edition. It helps you determine your planting times according to your first expected fall frost and, also, if you have one or more covers over your crops.

The summer nights are cooler in Standing Rock than they are here in Virginia. Besides warm nights, we have high humidity here. Our rainfall, about 44” annually, occurs fairly evenly throughout the year. Standing Rock gets only about 14.5” per year, mostly from April through October. Other places might get the bulk of their rainfall in the winter. More plays into your success in your garden than just knowing the frost dates, but that is a good place to begin to know your climate and when to plant. If you want to start keeping temperature and precipitation records for your garden, I have worksheets for that on the CD that comes with my DVD, Develop a Sustainable Vegetable Garden Plan. There is also a download code for these record sheets in my book, Grow a Sustainable Diet. Getting better acquainted with your garden this way will help you understand what Mother Nature is saying to you when you are there. Listen carefully.
homeplace earth


FEBRUARY 3, 1017 UPDATE: I was alerted that the map that appears on plantmaps.com is the USDA Hardiness map for 1990. The USDA updated their maps in 2012. Scroll to the bottom of that map and you will find a link to the 2012 map. There is also a link to the updated map in the right sidebar. Plantmaps.com has maps for countries other than the U.S., which should be helpful to many of my readers around the world.


Read Full Post »

snowstorm January 23 2016-BLOG

We were recipients of some of the snow that fell on the east coast over the weekend. It was 14” deep at our house. It isn’t the most snow that I remember having here, but it is the most since January 1996 when we had 20”. We still had our milk cow then and I remember shoveling a path to the barn when the snow was at 10”, knowing I would be shoveling again. The path had to be a wide one—wide enough for me to walk with two five-gallon buckets of water.

snow covered row cover--BLOG

snow covered low tunnel

This time around I have kept busy finalizing my presentation for the upcoming Virginia Biological Farming Conference, shoveling snow, and knitting a sweater. Snow like this disturbs everyone’s schedule, for sure. But, as bothersome as that is, it presents a lot of opportunities. Of course, if you have been following my blog, you would know that I look at everything as an opportunity. It is when our structures are tested and we find out how well we’ve done. If you planned your low tunnels, coldframes, and greenhouses to withstand your usual conditions, you might find them collapsed in the snow. This snow reveals if they were built beyond the usual conditions.

It is good to know. This is the sort of thing you have to plan for from the beginning. Yes, it doesn’t happen very often and may not occur again for another twenty years, but the way the weather has been in recent years, I would build with the assumption that it could happen every year. That will put you at ease whenever severe weather strikes again.

As the kids were growing up, whenever we had a big snow that shut things down my husband would take them for late night walks down the road for at least a half-mile or more. Well, the kids are grown and establishing their own snow traditions and now it is me accompanying my husband on those moonlight walks. We went out on Friday and Saturday nights under the full moon and it was wonderful. Since the power hadn’t gone out, which was surprising, noisy generators didn’t disturb the silent night.

The first night it was still snowing when we went out and there was quite a bit of wind. We were walking in the road on snow. The plows had been out, but that didn’t mean the roads were fit to drive on. The next night I could feel the difference in the surface beneath my boots. Although not much traffic had been on them, the surface had turned to ice and there were lots of drifts across the road. So much so that the drifting snow and icy road had caused a snow plow to get stuck. He was waiting for a tow when we came upon him about midnight.

path in the snow to the barn BLOG

paths to the chicken house and barn

That walk brought to mind how important it is to get out and walk the ground to really know how it is; although, I’m usually referring to walking in gardens, possibly in your bare feet, when I talk about that. Looking out my window, either from my house or a vehicle, couldn’t have told me the road conditions like walking on the ice and through the drifts.

The roads in our area are full of curves and wooded areas. Even when the roads are clear after a snow, we know to look out for the areas where there are trees on the south side. Their shade keeps ice on the road in spots long after it has melted elsewhere. We can learn about where the cooler areas due to shading are in our gardens by watching the snow melt. I wrote a blog post about that in February 2014.

I hope you have enjoyed the winter weather at your place. It reminds us not to take ourselves too seriously. Things we have planned to do get changed, and that’s okay. It is an opportunity to slow down and check on our neighbors. Sitting by the woodstove is great, also. And about that snow shoveling—welcome it as a needed winter workout and be thankful that you are healthy enough to do it.

Read Full Post »

Low Tunnel

Low Tunnel

Season extension structures resembling low tunnels are a great way to protect overwintering vegetables. I use them to have fresh greens—kale, collards, and chard—on the table through the winter months. They are easy to build with plastic pipe and either clear plastic sheeting or greenhouse plastic. I would love to not have any plastic in my garden, but until I have a better alternative, I make an exception for this.

Plastic pipe easily bends to form the arches that hold up the plastic cover. My garden beds are 4’ wide and I use an 8’ length of plastic pipe (1/2” inside diameter) for each arch, giving me a tunnel with a height of about 30”. Some people use metal electrical conduit for their arches, bending them around a homemade jig. I space the arches about 4’ apart down the length of the bed. Another piece of plastic pipe is put on top, becoming a ridge pole to connect the arches. A screw is used to attach the ridge pole to the top of each arch. It is important to have the ridge pole.

My arches are held in place by either putting them over pieces of rebar extending up from the ground or by inserting them into larger pieces of plastic pipe, also extending up from the ground. Whether rebar or larger plastic pipe is used, the pieces of each are cut to 2’ lengths. Plastic pipe can be cut easy enough and you can buy rebar already cut into 2’ lengths. Look for rebar where cement blocks are sold. One foot of each anchor piece is driven into the ground, leaving 12” sticking up to receive the end of the arch.

Next comes the plastic cover. You can find clear plastic sheeting in a hardware store or big box building supply store (look for it in the paint department). Make sure it is 6 ml thick to withstand the winter weather. This construction plastic has no UV protection, but since you are only using it through the cold months, you can get a couple years use out of it if you store it out of the sun and keep the mice away during the off-season. Greenhouse plastic is good if you can get it since it will last longer. If you are building a structure that will be in the weather all year long, go with greenhouse plastic. A piece 10’ wide is good to go over the 8’ arches covering my 4’ wide beds.

The easiest way to secure the plastic cover to the pipes is with plastic clips, called garden clips or snap clamps, that are sold for this purpose. Johnny’s sells them and they are available at other garden and greenhouse supply sources. You can make some from plastic pipe, but if you need to take them on and off, the ones you buy are easier to work with. Okay, I know it is December already and if you had greens to protect, most likely you have already put up a structure like this if you intended to. I’m really writing this post to talk about the covers. You can build a low tunnel from these directions, but if you stop here you will have problems when the wind picks up or when it comes to harvesting from your tunnel through the winter.

Screw eye inserted into arch secures row cover cord.

Screw eye inserted into arch secures row cover cord.

The plastic covers on my low tunnels stick out 12” on the sides. Some gardeners put sand bags, rocks, or pieces of wood on that extra to hold the cover down. On a calm day, it might seem to do the job, but the wind will easily whip the plastic out from under these things. Besides, if you have 18” wide paths like I do, there is no extra room for sandbags, rocks, or pieces of wood. You will be tripping over these long after the covers were removed in the spring, unless you are diligent in taking them up. It would take putting many clips across each arch to secure your plastic cover enough to hold it through high winds. Even if you were willing to work with that many clips, you need to be able to access the plants inside through the season and it isn’t practical to be messing with so many fasteners each time.

My solution is to put a cord across from one arch to the next, alternating sides. You need the ridge pole to hold the cord up. I usually use 1/8” nylon cord found in hardware/building supply stores, but have used old clothesline if that was available. If you already have a low tunnel and have experienced problems with wind, you can add this feature and alleviate problems the rest of the winter. It involves putting a screw eye near the base of each pipe the cord attaches to. I use a drill to make a pilot hole for the screw eye.

The bungee provides tension to hold the cord securely to the cover.

The bungee provides tension to hold the cord securely to the cover.

Years ago when I first did this I thought I needed to build a wood box and use pipe clamps to hold the arches, screwing the screw eye into the wood beside the pipe. Later I discovered that it is fine putting the screw eye directly into the plastic pipe. Of course, there is more material to screw into if there are two layers of pipe (the anchor pipe and the arch pipe), but it also works well if the arch is put over rebar. I have not put a screw eye into a metal pipe, but I imagine it would work well, also. If anyone has done that, I welcome your comments. Using a bungee cord between the screw eye on one end arch and the cord helps to apply tension to the cord.

The cord holds the plastic sheeting in place for venting or harvesting.

The cord holds the plastic sheeting in place for venting or harvesting.

There are so many great things about securing the cover this way. Most importantly, it doesn’t come off in the wind. Another advantage is that all those things you put in the path to hold the plastic down are not necessary anymore. And the harvest—it is so easy! You can lift the plastic at any point along the sides to harvest and it is held in place under the cord. You will still use clips, but only on the end arches. The cover can be cut to come a few inches over the end arches and be secured with the clips. A separate piece of plastic sheeting can be cut to fit the ends. In mild weather it can be left off. When it is needed, it can be secured with the same clip that holds the tunnel plastic, holding two pieces at once. There are so many ventilation advantages with a separate end piece. Once the weather gets severe enough for me to put on the end pieces, I will fold the top edge down for ventilation on the warmer winter days.

Venting the row cover ends.

Venting the row cover ends.

I got the idea for using a cord over the plastic cover from Eliot Coleman in his book Four Season Harvest. He used wire arches with a loop bent into it to anchor the cord. Arches from plastic or metal pipe with a ridge pole can withstand more severe weather than the wire arches he described. If you have been having trouble with the plastic covers on your row tunnels and haven’t used a cord to secure them, take the time on a mild day to go out to your garden and make the upgrade. You will be happy you did.Homeplace Earth

Read Full Post »

melting snow 2-18-14A recent snowfall gave me an opportunity to take some new photos. Things can come and go right before our eyes, and if we don’t take the time to look carefully we’ll never see them. I like to take photos of the snow melting to remind me of the variations in soil temperature and the micro-climates we have everywhere. I mentioned soil temperature in my post on Phenology. This garden photo was taken on February 18. The weather was warming and the first place the snow began to melt was on the south side of my garden beds, which run from east to west. When I see this in late winter I’m reminded of the idea I’ve always had in the back of my head to make the soil on a garden bed slant towards the south. This could be done in the fall and the bed would be ready early in the spring, or even late winter, for planting. The soil would warm first on the whole bed. With a cold frame on top, things could get off to a really good start.

melting snow in coldframeSo far, however, my coldframes have stayed on flat ground. The covers slant, since the front (south) side is 8” tall and the back (north) side is 12” tall. On February 20 I took this photo of the coldframe which had no cover for the winter because it wasn’t planted. The snow had melted everywhere except the places with the most shade. Since the sun is so low in the sky during these winter months, it casts a longer shadow. If I would have had a cover on that coldframe, the snow would surely have melted everywhere in there. However, the front of the box would still be shading the strip of soil beside it. The sides of the box cast a shadow, also, but only for part of the day. The east side (foreground) is shaded in the morning and the west side is shaded in the afternoon. The strip to the south (with snow) stays shaded all day until spring when the sun is sufficiently high enough in the sky to peek over the edge all day.

You could solve that problem by using a clear plastic row cover. With clear plastic coming all the way to the ground you don’t have that shaded area on the inside; however, the structure itself will shade just to the north. You can see that by the row cover in the topmost part of the coldframe photo. The area to the north of the coldframe is also left with a bit of snow where it is shaded. I don’t have plans to plant anything directly to the north of these two structures, but it is interesting to note. When I plant seeds in the coldframe I plant many rows. I run these rows across the short way, north-to-south. If that bit of shade on the inside is enough to affect anything, it won’t affect all of one thing.

melting snow by board fenceOther interesting snow / shade spots are to the north of our board fence. You would think that since there is space between the boards, the sun would reach through. There is also a line of snow to the north of the hazelnut hedge in the upper left of that fence photo. There is a wire fence there and the hazelnut trees have lost their leaves, but it is still enough to leave a snow line.

You don’t have to have snow to notice the shaded areas, but it is a whole lot easier. When I took the first photos on February 18 the snow had melted in the front yard, but not in the back yard (north side of the house). On February 20 when I was out with the camera I noticed that half the snow had melted in the backyard. There was still snow in the area that showed up as a shadow on the snow in my photos two days earlier. Last summer I paid particular attention to the sun and shade there in the flower bed near the house (very last place for the snow to melt). I was looking for a space to plant a few cotton plants that I wanted to keep separate from my other cotton. I determined that the sun was high enough, and would be that way long enough, for the cotton. It was with careful consideration that I put those cotton plants there. That would have worked, too, except that the summer was extremely cloudy and even the cotton that was planted in the sunniest part of the garden didn’t mature. Oh well.

I’m sure you’ve noticed the days getting longer and spring will be here before you know it. The sun will cross the sky a little higher each day, making the shadows not quite so long. If you pay attention to the little nuances occurring in your garden you will be off to a good beginning as you start your seeds and set out transplants.Homeplace Earth

Read Full Post »

after the frost foodThe first hard frost of fall has come. I think it happened here on October 24. I can’t say for sure because I was in Ohio visiting family. I knew the seasons would be changing in the eight days I would be gone. In preparation for leaving I was busy cleaning up the garden, which goes hand in hand with building compost piles, and planting cover crops. When I returned on October 30 the leaves on the trees had changed colors and the newly planted cover crop seeds had sprouted.

When the first hard frost comes in the fall, everything changes in the garden. The pepper plants that were so lush the day before are now wilted, along with so many other warm weather crops. That doesn’t mean your garden is finished for the season, however. This is the time for the cold weather crops to take center stage. I look forward to the frost bringing out the sweetness in the carrots and greens. In fact, I don’t worry about growing carrots to harvest in the summer anymore because we are so spoiled with the ones we have in the cold months. For the next six months we will have sweet carrots fresh from the garden. I’ve previously written about how I grow my winter carrots.

Other fall and winter crops that we eat fresh from the garden are beets, Jerusalem artichokes, collards, kale, chard, and parsley.  There are more root crops that I could add to the list, if I had grown them this year. Those crops are turnips, Daikon radish, and kohlrabi. No doubt, some of my readers could add more choices. With onions and garlic, potatoes, sweet potatoes, cowpeas, and peanuts from stored harvests, there is a wealth of food one can eat without further preservation. Our winters here in Zone 7 are not so mild that we don’t need protection for the greens if we want to have a continual harvest. Even at that, picking once a week is what to expect, and less frequently during the weeks of the least daylight, so more area needs to be planted for winter harvest than needed for a spring planting.

kale-row cover-carrots-BLOGI don’t cover the carrots and beets with anything so as not to encourage voles to move in. They are planted early enough to be mature now, so only need to be held in cold storage in the soil. For protection from harsh winter weather for the greens I use low tunnels made from plastic pipe and old greenhouse plastic. This type of cover is easy to erect. The ½” plastic pipe can be inserted into larger size plastic pipe stuck in the ground or put over pieces of rebar. The rebar and larger plastic pipe is cut to 2’ lengths and put half in and half out of the ground. If you leave rebar in the ground without a hoop over it, be sure to cover it with a plastic bottle, piece of plastic pipe, or an old tennis ball. You don’t want anyone to get hurt if they stumble upon it. You can find rebar precut to various lengths in the building supply stores near the cement blocks. Plastic pipe comes in 10’ lengths. I cut it to 8’ to form a hoop over a 4’ wide bed. These pipe structures also have a pipe across the top and a cord (anchored to the bottom of the hoops) that goes over the plastic cover to keep it in place. More details about that are at my blog post Managing a Cold Frame, Low Tunnel, or Mini-greenhouse. The plastic is held to the end hoops with clips made especially for that purpose. They are nice to have.

row cover clip

row cover clip

Having this bounty of food available in my garden all winter is the result of careful planning done sometimes a year in advance. To have the cabbage family greens at a good size now is sometimes a challenge, since they would have been started during hot weather. I have to keep a vigilant watch to pick off cabbage worms and harlequin bugs during those weeks. The seeds are started in the coldframe, not because they need protection, but because the coldframes are my seed starting areas. I do, however, sometimes cover the coldframe with a shadecloth if the weather is too hot and sunny. Once established, the best plants are transplanted to the garden beds. The winter covers don’t go on until cold weather hits. I’m just now bringing the covers out. A big advantage of using this type of low cover, rather than a greenhouse, is that the covers are easily added, removed, or vented, allowing the plants to get the full benefit of the natural climate, including the rain.

If you don’t have this variety of food available in your garden after the frost, and would like to, start making notes now and work on your garden plan to make it happen next year. Go ahead and prepare a bed and put a cover on it now, or at least put up the hoops and be ready for a cover. In late winter you can use it to get off to an early start. Put the cover on two weeks before your planting time to warm the soil. When my community college students planned a season extension structure for their projects, many of them constructed their designs, but put in transplants and seeds too late for a fall or winter harvest. However, often they found they had a very early spring harvest from those plants, especially with things like spinach. If you have the time and inclination to prepare now, it will put you one step ahead for early planting next spring.Homeplace Earth

Read Full Post »