Feeds:
Posts
Comments

Archive for the ‘grains’ Category

corn sheller box

Corn Sheller Box

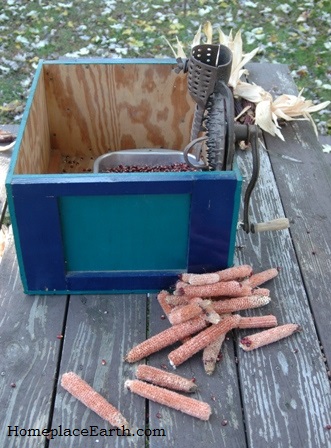
Corn is a wonderful crop and I encourage people to grow varieties for cornmeal. In order to do that, you need to grow it out until it has dried on the stalk. The stalk will have dried, also. If you have grown only a small amount you can use your thumbs to push the kernels off the cobs. It doesn’t take much to make you start thinking of easier ways to do that job. I have a corn sheller that I found at an antique mall years ago. Corn shellers need to be attached to something to use them properly. I have mine on a box that I made from scrap wood. Painting it makes it not look so scrappy.

ejecting the cob

The sheller is mounted close to one side so the cob will be ejected away from the box.

My corn sheller box measures 18” wide, 21½” long, and 12” high. I would use different dimensions if I were making a new one and I’ll be telling you about that. You can see that I framed the outside of the short sides in wood, in addition to the plywood for the box. That provides extra support and the top piece is a nice edge to hold onto when I’m carrying it. I carry it with the corn sheller against my body and my hands grasping that top strip on each side. It is more manageable than holding the box by its bottom. There is a 1” x 1” nailing strip on the inside bottom edge of the long sides. This is a sturdy box. The sheller is mounted close to the end on one side so that the cobs are ejected to outside the box. I suppose you could hang a basket on the side to catch them.

corn sheller

When I travel I enjoy stopping at antique malls. It used to be I could find corn shellers for $25 – $30 dollars. I would take them apart and add the necessary bolts and wingnuts, give the moving parts some grease, and resell them to my students at the community college for $30-$35 dollars. One hole for the bolts to attach the sheller to a box is usually accessible, but the other is not. The wheel needs to be removed to be able to put a bolt there.

corn sheller on box

Bolts and wingnuts attach the sheller to the box.

One year I turned over five corn shellers to my students, putting them into the hands of people who would bring them back to life. The price may have gone up some by now, but there are still some good ones out there. Two things to look out for are the tabs that allow you to bolt the sheller to the box and the handle. Sometimes those tabs are broken off and you would have to find an alternate way to attach the sheller to a box—maybe with a clamp. It is nice to have a good wooden handle. Some of the corn shellers I have seen have lost the wood on their handles, leaving only the metal rod. The handle could be replaced with a handle that you can buy to put on a file. You can find old corn shellers on ebay. You will have to pay shipping, but if you aren’t in the mood to shop around at antique malls, maybe you don’t mind that.

The box for my corn sheller is easily stored in the barn with other seed processing equipment in it. Since I shell my corn all at one time in the fall it is only used seasonally. After shelling, the corn is stored in half gallon jars in the pantry. If you have grown corn to feed to livestock and have your year’s supply stored in the corn crib, you might be shelling it out through the year as you need it. At our state fair one year, I saw a corn sheller mounted on a box that had legs tall enough to get a bucket under it. The floor of the box was slanted toward one end. The side at that end had a hole that was covered by a piece of wood that could be slid up to allow the corn to flow into the bucket. That is a handy design, especially if your sheller is used regularly and needs to be a stand-alone piece of equipment.

pan inside corn sheller boxYou do have to think about how to get the corn out of the box. You could tip it on end and pour it out, which is awkward to do. You could reach in with a large kitchen spoon and scoop it out. Flat pancake turners also work to get the corn out of the corners. I used those things until I realized I could put a large pan in there to catch the corn. In the photo you see the pan I use to roast a turkey in at Thanksgiving. It has many other uses, but I bought it for the turkey long ago. It is larger than a large cake pan. If I was to build a new box I would decide what pan I would use to catch the corn and size the box accordingly. A plastic bin would work, also. (Maybe I should look for a pan that fits the box I already have.) In the photo you can see my Bloody Butcher corn in the pan and some kernels that escaped it. After I took the pan out I had to round up those wayward kernels with the pancake turner. The photo shows just how the corn dropped. If the box more closely fit the pan, those stray kernels would have landed in the pan.

Corn shellers are still made, so there are new ones available; but if you can find an old one at a reasonable price, don’t hesitate to get it. Don’t let a little rust on one deter you from buying it. Keep your eyes open and you will find a good one that you can use. Happy shelling!homeplace earth

Read Full Post »

Growing Protein--BLOGWhen we think of protein foods we normally think of meat, dairy and eggs. However, we can also get protein from plants. Beans and grains contain the most, but there is some protein in all vegetables. Of course, if you depended on a plant-based diet for your protein, you would be wise to look to the concentrated plant sources for your needs, unless you are eating a really large amount of food.

Protein is used by the body for building and maintaining. It stands to reason if you are pregnant or nursing, or have been injured and need to repair tissue, your protein requirements would be higher than the recommended daily allowance of 46 grams/day for women and 56 grams/day for men. In my last post I talked about growing potatoes for needed calories. Potatoes have 7.7 grams of protein per pound, so if you ate a considerable amount of potatoes, you would also be racking up the protein. Carol Deppe spent a winter eating a lot of potatoes and wrote about it at http://caroldeppe.com/ThePotatoBin.html. On the other hand, if you ate corn and beans for protein, you would get about 40 grams of protein for each pound of corn you ate and over 100 grams per pound of dry beans. In addition to potatoes, Deppe grows her own beans and corn. If you are interested in growing a significant part of your diet, her book The Resilient Gardener needs to be on your reading list. 

Protein is made up of amino acids, many of which can be synthesized by the body, if enough nitrogen (protein) is available. However, there are eight amino acids, referred to as essential amino acids, that need to come from the food we eat. Animal sources have all the essential amino acids and plant sources do not. Interestingly enough, the ones the legumes (peas and beans) are lacking are the ones that the grains have plenty of, and vice versa. There are reasons for the traditional meals such as cornbread and beans, tortillas with beans, and beans and rice. Even peanut butter on whole wheat bread serves to give you the right combination. Beans and grains don’t need to be eaten at the same meal to get the benefit, but they both need to be in your diet somewhere.

Besides protein and calories, including grains in your garden plan provides carbon in the form of stalks and straw for compost making, necessary for feeding the soil without bringing compost materials in. In my garden I have straw from wheat and rye in June and from cornstalks in the fall for compost. Besides the straw from wheat and rye, much organic matter is left in the soil from their decomposing roots. The legumes are soil enriching crops, leaving behind nitrogen for the next crop. The most nitrogen is left in the soil if the legume crop is harvested at flowering, as you would if you were growing it only as a compost crop. After that, nitrogen is put toward producing the beans or peas. Nevertheless, some nitrogen stays behind and it is good to have legumes in your rotation.     

Other protein sources from your garden are peanuts and sunflowers seeds.  I harvest peanuts before the frost kills the vines, hanging them in the barn for the peanuts to dry on the vines. I pick off the peanuts when they are ready. You can see that in my DVD Cover Crops and Compost Crops IN Your Garden. The vines become compost material, but that peanut hay could also feed small livestock. Peanuts and sunflower seeds contain 117.9 and 108.9 grams of protein per pound respectively. These crops also supply needed fat in your diet. In addition, they can be used for cooking oil. More information about that is at my post https://homeplaceearth.wordpress.com/2012/07/10/using-a-piteba-oil-press/. Sunflower stalks, like the cornstalks, are used in the compost. 

In a permaculture garden you might have hazelnut (filbert) trees. Hazelnuts have 57.2 grams of protein per pound. My hazelnuts form a border on the north side of my garden. I wrote about hazelnuts at https://homeplaceearth.wordpress.com/2012/03/20/hazelnuts-filberts-in-my-garden/. Hazelnuts trees can be pruned, with the trimmings feeding your rocket stove. These nuts also provide fat in your diet and can be pressed for oil. 

 Okay, I know you aren’t going to be eating a pound of beans or corn at a meal. In terms more easy to understand, a cup of boiled cowpeas (the beans I grow) has 13.3 grams of protein. I use ½ cup cornmeal, cooked with milk or water for a good-sized serving of cereal. That cornmeal has 5 grams of protein. A thick slice of homemade whole wheat bread has 3.9 grams of protein. A one ounce serving of peanuts has 7.4 grams. By comparison, a cup of milk contains 8 grams of protein and one large egg contains 6.3 grams. 

If you have enough calories in a varied homegrown diet, most likely you are getting enough protein. As you can see, growing grains for compost naturally gives you protein foods. If you were growing a significant part of your diet, you would also be concerned with having enough calcium. That’s the topic for next time.


More about Growing Protein at http://www.motherearthnews.com/permaculture/growing-protein.aspx.

Read Full Post »

crimson clover and hairy vetch-BLOG

hairy vetch on tomato fence and crimson clover

You did a good job last fall getting cover crops planted.  Now, they’ve taken over your garden and you don’t quite remember what you had planned to do with them. What you’ve done is to grow great biomass for your garden that you can use as compost material or cut down as mulch right where it was grown.  Give yourself a pat on the back!  The next step is to cut it down at the right time as mulch-in-place or cut it and put the material in the compost pile.  At this stage it is all green matter and your compost would benefit from an addition of an equal amount, by volume, of dry, carbon material.   At this time of year my carbon comes from Jerusalem artichoke stalks, or sorghum and cornstalks that I put aside in the fall.  Maybe you have access to leaves, hay, or straw.  If you are bringing in that material from outside sources, read my post Killer Compost to know what to look out for.  Water well when building your compost pile.

cereal rye-BLOG

cereal rye

Last May I wrote Cutting a Rye Cover Crop at Pollen Shed.  It speaks to the importance of cutting your cover crop, in that case cereal rye, at the time when it has reached its most biomass, just before it produces viable seed.  For any crop, that would be when it is flowering. You don’t normally think of grain crops with flowers, however, you will see where the seed heads begin to form and the pollen will be hanging off it.  If you cut it earlier than that, the rye and wheat plants, like the grasses they are, will grow back.  If you wait too long, seed will form. That’s okay if it’s seed you’re after.  In that case, you would wait longer to cut it and need to make sure the seed has matured. One way to test is to cut a few seed heads and thresh out the seeds in your hand.  If you don’t get seed that looks like what you planted, it’s not ready. After the plant has put its energy into seed production, it begins to die. You will see the rye and wheat plants begin to turn brown when it is time to harvest the seed.  The harvest will be seed and straw and usually occurs here in mid-June.

Here in the Mid-Atlantic in zone 7 our last frost date is around April 26.  Cereal rye is my major cover crop and generally sheds pollen around the end of the first week of May.  That’s also about the time that the farmers who are on top of things are making their first cutting of hay.  This year, however, the weather seems to be all mixed up. We didn’t have much of a winter and warm weather arrived early.  Usually we have a spike in the temperature in the second week of April, fooling people into setting out their tomatoes, only to turn colder before the weather has settled.  The weather did a good job convincing my rye that warm weather was here and it flowered early.  I cut it in the beds where it would be left for mulch on April 20. I’m really interested to see how the rye and wheat do that are in the beds to be grown out for seed. The temperatures here dipped into the 30’s on April 24th and 25th after nighttime lows in the 60’s on April 16th and 17th. Looking back to my temperature records from last year, I see that the April nights were consistently warmer in 2011.  Last year I cut the rye for mulch on May 10.  It must be the lack of winter this year, not warm April nights that brought the rye to flower earlier in 2012.  My video Cover Crops and Compost Crops IN Your Garden shows my management of this system.

crimson clover-bee hovering-BLOG

crimson clover with hovering honeybee

It might be that you have grown Austrian winter peas or crimson clover as your cover crop. These crops are legumes which fix nitrogen from the air in the nodules on their roots, returning that nitrogen to the next crop as those roots decompose in the soil.  You could cut these crops at flowering and let them lie as mulch, as with the rye, but their biomass wouldn’t be as long lasting as the rye.  They are best used as green material for the compost, adding carbon to capture all the nutrients as composting occurs.  Crimson clover, not to be confused with red clover, is a beautiful plant that generally flowers here around mid-April.  The legumes can be easily pulled out or cut for compost material and the bed planted soon after.  I wait two weeks to transplant after cutting the cereal rye beds for mulch, but I could transplant sooner than that into the legume-only beds.  If I was seeding into the beds, I could easily do that in a legume bed two weeks after cutting.  If I was only after the biomass and in a hurry to get the next crop in, I would cut crimson clover as soon as it has flowered.  However, I have bees that enjoy it, so I wait a little longer before cutting so they can have the most benefit from the clover blooms. 

Sometimes hairy vetch is planted in the fall to precede tomatoes.  I’ve done that in two tomato beds this year.  I prepared the beds last fall and moved the tomato trellises there at the same time. The vetch grew up and I cut it April 25.  My tomatoes are ready now in the coldframe for planting out.  I started the seeds there on March 16.  Having grown in the coldframe, they are already acclimated to the outdoor temperature fluctuations.   Sometimes hairy vetch can be a nuisance in the garden.  In the past I’ve used it as a companion to the wheat and rye and you can see that in my cover crop video.  You can also see how it became a problem in the rye.

It is good to plant a small amount of a legume into your grain crops and the legume I use now is Austrian winter peas, a winter hardy variety of field peas. Both the vetch and winter peas will grow quite tall and could pull down the grain if left to grow.  That doesn’t matter if I’m just cutting the crop to lie down as mulch, but if I want the grain later in the season I need to pull out the vetch or winter peas.  Austrian winter peas are much easier to pull out than the vetch.  If you are growing grain on a larger scale than your garden bed, you might choose red clover as the companion to the wheat or rye.  You can seed it into the growing grain in the spring.  The red clover will grow some and provide a nice green cover when the grain is harvested, then it will keep on growing and a harvest can be taken the first summer.  Let it grow over the winter, then harvest twice the second summer.   After that it is time for another crop for that space.

You can find the best cover crops for your location and situation by reading Managing Cover Crops Profitably, 3rd edition, available from www.sare.org.  Be sure to read all the text, not just look at the charts.  There is a lot to learn and every time you think you have it down, something else comes along to figure out.  The important thing is to let the soil and the garden guide you.

Read Full Post »

swt potatoesX3, kale, cowpeas--BLOG

sweet potatoes, kale, and cowpeas

Once again, I decided to observe Homegrown Fridays, eating only what I’ve grown on the Fridays in Lent.  Anything you see in bold followed by * is listed on the Recipes page of this blog (click on the recipe tab at the top).  This year was more of a challenge because of other commitments.  I started two weeks early so I could get in seven Fridays and even at that, two of the Fridays were actually Thursdays.  I finished early so that I could be off on another adventure.  If you’re reading this the first week in April, 2012, I’m at Tillers International in Michigan finding out more of what they do there while my husband is taking a class in timber framing.

The delicious dinner you see in the photo was one of my meals.  It consisted of kale harvested fresh from the garden, Arkansas Razorback cowpeas, and three varieties of sweet potatoes–Ginseng, Beauregard, and purple.  When I have no “homegrown only” restrictions, I would probably put butter on the cowpeas and sweet potatoes and vinegar on the kale.  I enjoyed the natural flavors of that food without butter and vinegar. 

polenta with tomato sauce--BLOG

polenta with tomato sauce

I had dried a variety of things in my solar food dryers last summer and had looked forward to using them for Homegrown Fridays this year.  I made a soup using as many of them as I could*.  Dinner one Friday was polenta topped with tomato sauce*.  Cooked Mississippi Silver cowpeas accompanied that meal.  Polenta is just another name for cornmeal mush that has been cooked a little longer and let set to thicken.  I cooked it in a crockpot the day before, then put it in the refrigerator.  At dinnertime I put tomato sauce over it and heated it in the oven.  When I cooked the cornmeal and water for polenta, I added dried onions.  I froze some, which made an easy lunch to heat up on another busy Homegrown Friday.

I was fortunate to have peanuts this year and made peanut butter for the first time in my GrainMaker  mill.  I had better luck grinding raw peanuts than grinding roasted peanuts to make peanut butter.  I made it twice and, although I’m sure I’d get better at it with practice, it’s a whole lot easier, and less cleanup, to just eat the peanuts as they are.  The folks in Biosphere 2 grew peanuts with the intent to press them for oil, but decided to just eat them as a snack.  Peanuts were one of their main sources of fat.  Their two year experiment with eight people living in a completely sealed environment and producing all their food is documented in the book Eating In: From the Field to the Kitchen in Biosphere 2 by Sally Silverstone.  I made peanut butter to have with carrots from the garden.  That day I also made sorghum crackers.  Recalling a recipe for greens in peanut sauce from the cookbook Simply in Season, I made a version of that with my dried collards.  I put peanut butter with the dried collards and water while it cooked.  We ate it as a vegetable for dinner, but I liked it better as a sandwich filling for a meal another day.  It would have made a good dip.  

bean burgers and sorghum breadsticks--BLOG

bean burgers and sorghum breadsticks

I made “bean burgers” for the first time.  It’s something that’s long been on my “to-do” list.  I used cooked cowpeas, reconstituted dried onion and dried sweet pepper, and minced garlic.  The cowpeas were boiled until really soft.  I mashed everything together and made it into patties that I topped with tomato sauce and baked.  Breadsticks made with sorghum flour were served with that.  

One day lunch was home-canned green beans cooked with dried cabbage and onions.  Sorghum patties (made like corn patties*) rounded out that meal.  A couple lunches were sweet potatoes, peanuts, and raisins.  Peanuts, raisins, and popcorn were great to have among my choices of homegrown food.  Last summer I dried grapes for raisins by cutting the grapes in half and drying them in the solar dryers.  The seedless grapes were best for that.  Popcorn was popped in a pan with no oil for a snack some days.  Just be ready to shake the pan a lot to prevent burning.  When limiting your diet like this, it is good to plan for something quick to eat if you are really hungry and you still have to plan dinner.  Peanuts, raisins, and popcorn filled that need nicely and could be taken along if I had to be gone somewhere. 

cornmeal mush with hazelnuts and honey--BLOG

Bloody Butcher cornmeal mush with hazelnuts and honey

Breakfast was the easiest meal and always the same.  I had cornmeal mush made with my Bloody Butcher Corn.  I sweetened it with honey from my bees and added hazelnuts, which were great.  You can read about my hazelnut harvest in my last post.  My black walnut trees seem to bear alternate years and didn’t drop nuts in 2011. The staples in this homegrown diet are cornmeal, sweet potatoes, cowpeas, and greens.  I had sorghum and wheat for additional flour and the dried vegetables were much appreciated, especially tomatoes and onions.  I had some naturally fermented sour pickles and garlic that I chopped up and added to cowpeas for lunch one day.  Herbs, dried and fresh, add diversity to the flavors.  I was happy to harvest fresh celery leaves in the garden.  The parsley I used was dried.  Eating this way makes you really appreciate each additional flavor and texture.  You might be interested in reading about  my 2011 Homegrown Friday experiences.

I drank water or herb tea.  Currently my herb tea blend consists of spearmint, bee balm, lemon balm, and basil.  On these Homegrown Fridays my husband and I often opened a bottle of mead made from our honey and grapes or elderberries.  We feel very fortunate to have such bounty from our garden.  At the same time, we are mindful of those in the world who don’t know where their next meal is coming from.  We hope that our work here will help towards the understanding of what it would take to feed others.  The learning is in the doing.  I hope some of you will try a Homegrown Friday or two at any time of the year.  It is definitely an experience.  

Read Full Post »

Bloody Butcher corn drying in the barn

If you’ve seen my video Cover Crops and Compost Crops IN Your Garden, you know that I grow Bloody Butcher corn for cornmeal.  I chose that variety because back in 1991 Mike McGrath made a big deal about it in Organic Gardening magazine. I liked the color and that it was an heirloom, so I grew Bloody Butcher the next year.  I also put in a variety of yellow corn that year and Bloody Butcher did the best.  I’ve been growing it and saving seed ever since.

Growing flour corn is similar to growing sweet corn—except you just leave it on the stalk to dry.  With sweet corn you are watching for just the right moment to pick it at its best.  There’s not so much bother with flour corn.  Nature protects the ears from the birds with the husks.  That doesn’t help against the raccoons, but in his book Small-Scale Grain Raising, Gene Logsdon suggests putting old socks over each ear to protect from four-legged predators.  I haven’t tried the socks.

corn ready for harvest

When it’s ready to harvest, the stalks will be mostly dry and often the ears will point downward, but not always.  Choose a dry day and pull off the ears, husks and all.  I pull back the husks on each ear and, using baling twine, tie the ears together in a long string, tying them where the ear meets the pulled back husks.  I hang these strings in the barn out of reach of mice and birds.  I usually do this in early September.  The corn would have been transplanted about May 21 .  The corn still needs to dry down a bit more after harvest, and I’m pretty busy anyway in September, so sometime in October I get around to shelling it.

corn sheller in action

Shelling corn is a lot of fun if you are using a hand-cranked corn sheller.  If you are using your thumbs it’s not so much fun and blisters form pretty quickly.  You can find a shiny new red corn sheller at Lehman’s for $239.  I see there’s one on the internet at Pleasant Hill Grain for $80.  I’m sure there are differences, but besides the color (red and green), the only difference I can see from the pictures is that you need to adjust a wing nut for cob size with the Pleasant Hill model.  The old ones I’m familiar with have a heavy spring that adjusts automatically.   My favorite place to find corn shellers is antique malls.  You can also find them on E-bay.  I prefer the antique malls since I can see what I’m getting.  No doubt, what you find will be rusty, but that’s okay.  A little wire brushing will clean it up, but it would work fine as it is.  Wood missing in the handle is one thing to look out for.  There are plenty of good ones out there, but if you do end up with one missing the wood, you could use a handle suited to putting on a file, as a friend of mine did.  You should be able to buy an old corn sheller for under $50 if you take your time and keep your eyes open.  A popular brand name is Black Hawk.  You need to attach a corn sheller to something, usually a wooden box that you’ve made.  The shelled corn drops right into the box and the empty cobs shoot out and away.  If you are really on a tight budget, you might want to go the primitive route and make a sheller out of a board and a few nails.  This 1983 article in Mother Earth News will show you how–http://www.motherearthnews.com/do-it-yourself/1983-01-01/a-primitive-but-free-corn-sheller.aspx. 

I wash the corn kernels as I did the wheat and you can check that out at my blog post Grains in Your Garden.  Once it’s dry, I store it in jars in my pantry, after I put it in the freezer for a few days first to insure against insect damage.  When I’m shelling, I take note of my best ears and keep that seed separate for planting next year.  I might keep that in the freezer all year.   

Bloody Butcher corn ready for the pantry

Corn feeds us and the soil.  Corn is an easy to grow grain that can be a staple in your diet.  People who have issues with gluten can enjoy eating corn. The stalks provide carbon to feed back the soil by way of the compost pile.  I chop them with a machete in lengths convenient for compost material.  Corn is one of the “five crops you need to survive and thrive” that Carol Deppe wrote about in The Resilient Gardener.  The other four crops are potatoes, beans, squash and eggs.  Deppe is a seed breeder and has developed certain varieties for particular uses and has come up with her own recipes.  Being gluten intolerant herself, she has included her recipe for corn bread that contains no wheat flour in the book.  Published only a year ago, this book is a “must read” for anyone wanting to grow a major portion of their diet.

You can find out how the Hidatsa Indians traditionally grew and managed their corn by reading Buffalo Bird Woman’s Garden.  It also covers squash, beans, and sunflowers and is an excellent historical account.  With a little research you might be able to find out which heirloom varieties have been grown in your area.  Or maybe you might read an article about an interesting variety and start from there, like I did.  If you don’t want to have to grind corn and make cornmeal, but you would like the experience of growing corn and harvesting it dry on the stalk, grow popcorn.  You can shell out just what you need at the time and it won’t be too bad on your thumbs.  You could use the stalks for your Halloween decorations, then chop them for the compost pile.  Even a small amount would be fun to get started with.  I hope you keep corn in mind for your 2012 garden.

Read Full Post »

shock of wheat

Growing grain in your garden is great for both your soil and for you.  Your soil gets the benefit of the roots left from the cover crop, the straw goes to the compost pile which ultimately gets returned to the soil, and you have seeds to grind for flour or to save for another planting.  I grow both wheat and rye, but since I wrote about cutting rye early to lay down for mulch on 5/17/11, I’ll direct my comments today to wheat.  The process I’ll write about is the same for both.  Gene Logsdon is the first person I knew of talking about growing wheat back in the ‘70’s when he wrote about growing a “pancake patch”.  His book, Small–Scale Grain Raising, was published in 1979 by Rodale Press.  It promptly went out of print, which is why I was thrilled when the second edition was published in 2009 by Chelsea Green.   Gene Logsdon’s writings had a huge effect on my evolution as a gardener in the 1970’s-80’s.  I encourage all of you to read as many of his books as you can, both the new and the old, and visit his blog at http://thecontraryfarmer.wordpress.com/

I plant winter wheat in the fall, trying to have it in by mid-October.  I  broadcast it into a prepared seedbed and gently chop it in with a cultivator or rake.  It could also be sown in furrows.  Whenever I’ve tried transplanting it, the results were not as good, so I don’t transplant small grains.  The time to harvest here in zone 7 is about the second week of June for wheat and the next week for rye.  I cut it with the same Japanese-style sickle that I told you about in the post about the rye.  Keeping all the grain heads going the same way, I put it in bundles, tying each with a wheat straw.  My video, Cover Crops and Compost Crops IN Your Garden, shows me doing that.  The grain needs some more drying time before it is threshed.  You could store it in a building, but make sure to protect it from birds and mice.  I’ve gotten better at putting the bundles into shocks, so I do that and leave the shocks in the garden for about a week, then thresh.  It’s okay if it gets rained on, and of course, the dew will fall each night.  This weathering is all for the good and the changes in the grain make it better for your body to digest.  I believe one of the reasons so many people have problems digesting wheat is because of how it is handled in our industrial food system.  All the more reason to grow your own.

threshing-bat method

Until now, my favorite way to thresh wheat and rye has been with a plastic baseball bat.  I lay an old sheet on the ground and put a piece of plywood on top, with the other end leaning against the picnic table.  From a standing position, I hold the wheat, heads down, against the plywood and hit the seedheads with the bat.  The grain falls down to the sheet.  I gather the sheet and can pull off a lot of the larger chaff with my hand.  Everything else gets poured into a container for winnowing.  That way is shown in my cover crop video.

threshing-foot method

My newest method allows me to sit down on the job and use my feet.   I use an old bread tray and insert a piece of 1/2 “ hardware cloth, but you could make a frame of 2×4’s with a 1/2’” hardware cloth bottom.  I lean the tray against the picnic table bench as shown, sit in the chair in front of it, and use my feet to shuffle against the grain heads. The wheat seeds land all in one spot behind the threshing tray.   You can see the bundles of wheat on one side of the chair and the threshed straw on the other.  I wear clean shoes that I save for that job only.  As before, I also used a sheet under everything so that I could gather it up and pour the grain and chaff into a container for winnowing.  That frame with the hardware cloth will come in handy to hold vegetables for rinsing right in the garden.  You can just spray them off and let them drain.

The easiest way to winnow (separate the grain from the chaff) is to pour it from one container to another in front of a fan, making sure the bottom container is a deep one so the grain doesn’t bounce out.  Do that a couple times.  Don’t worry if every bit of chaff doesn’t come out, because it will all come out in the wash.

floating off the chaff

I’ve never read of anyone washing their grain, but I do. I’m not a clean freak when it comes to food, it’s just a practical management technique for me.  I put the grain in a large bowl and add water.  Any remaining chaff, underweight seed, insects, etc. will float to the top.  You might even find a bird dropping that you threshed out of the straw. It happens.  Pour off what has gathered on top and fill again, giving the grain a stir to release more stuff.  Once you are rid of what floats off, you may notice some grit in the bottom of your bowl. That is from dirt you’ve harvested with the grain.  Pour it all through a strainer or colander that will keep the grain in and let that grit out.  Having different sizes of sieves and colanders is good for using with many seed saving activities.  Watch for them at yard sales and thrift stores and build your collection so you can accommodate the different sizes of seeds you will be saving in the future.

Now for the drying.  I first pour the grain out onto towels to air dry, then I put it in large cake pans or wooden bowls and let it set out until I’m sure it’s good and dry, stirring it around when I think about it.  When I’m sure it’s dry, I put it in glass jars.  There are faster drying methods, but that’s how I do it.  I put the jars of grain in the freezer for three days to ensure there will be no insect problems.  Then I store the jars in the pantry.

Grains are an important part of GROW BIOINTENSIVE Sustainable Mini-farming.  John Jeavons of Ecology Action has posted some GROW BIOINTENSIVE videos on his website at www.johnjeavons.info/video.html.  In Session 6, part B, you can see my friend Dan harvesting and threshing rye.  The Ecology Action Booklet 33:  Grow Your Own Grains:  Raising, Harvesting and Uses by Carol Cox is full of good information.  You can find that in the Bountiful Gardens catalog.  The best yield I’ve gotten for wheat in my garden is 4.4 lbs. per 100 sq. ft.  and for rye it’s 6.3 lb. per 100 sq. ft.  It’s usually less than that, but I know I can do better and I’m always looking at different varieties.  No matter what you’re growing, it’s important to find the varieties that do well for your particular climate and soil.

Growing your own grain adds a new dimension to your garden.  Even if you don’t want to grow it to eat, you could let some of your rye grow out to seed to save for your next cover crop.  Growing even a small amount of wheat is especially fun with children.  One year when my grandson was helping me thresh, we decided to read up on The Little Red Hen and were surprised to find several different versions of the same story at the library. We read them all. Make your garden an adventure and have some fun.  Maybe you can use some of your wheat for pizza dough.  I have some tomatoes and peppers in the garden.   Now if I could just grow some cheese.

Read Full Post »