Feeds:
Posts
Comments

Archive for the ‘cowpeas’ Category

taking a soil testOver the years, whenever anyone asked me for advice on organic gardening, my response has always been Feed the Soil and Build the Ecosystem. Often they were expecting recommendations on what amendment or pest control product to use. However, you need to look at the whole system, rather than addressing symptoms of imbalance as they pop up. Now that permaculture is becoming more widely publicized, whole system management is more well known

Feed the Soil—Now is a good time to take a soil sample. I send my soil samples to Waypoint Analytical, formerly A & L Eastern Labs. If you are not good at interpreting the results that they send you, you could contact John Beeby at www.growyoursoil.org for organic fertilizer recommendations. Check with his website for which test to request and where to have it done. You will need to sample the soil from many places in your garden, then mix everything together for your sample to send in. The soil you see in the photo looks really good, but remember that I have been working on my soil for many years.

Correcting imbalances in your soil is the first thing to do if you are not receiving the results you want in your garden. Sometimes, well meaning actions can lead to imbalances, including adding a lot of manure to your garden every year without testing first. Sometimes people lime every year because they assume it is a good thing. It is only good if your garden needs more lime. Even if you do not do a soil test each year, you should have one to use as a baseline, then do one a couple years later to see how things are going. Make cover crops a part of your soil building efforts. The organic matter they add with their roots, and with the plant matter you harvest and use as mulch or compost material, is a tremendous benefit.

Build the Ecosystem—Well-nourished soil cannot go it alone in producing good crops. Malnourished plants will attract insects that will take them out, for sure. However, even well- nourished plants need pollinators. Also, if there are any insects munching your plants, you want to have beneficial insects taking up residence in your garden to eat them. In order for the beneficials to stay, there needs to be some other insects around as food. Buying insects to add to your garden is not as effective as attracting and naturally growing your own,

Chemicals, even those approved for organic production, can harm beneficial insects, as well as the not-so-desired ones. Furthermore, you have to acquire and apply the chemicals. If you include plants that attract the good insects into your crop mix, all you have to do is to stand back and watch the show. That’s what happened when I planted mountain mint, as well as other plants in the margins of my garden. I had visitors to my garden this summer who stopped in their tracks and asked the name of the plant when they saw all the buzzing around the mountain mint. It was an insect frenzy! Tansy is also well-documented as attracting beneficial insects.

goldenrod with honeybees and butterflies

Goldenrod with honeybees and butterflies.

The best time to witness beneficial insects on your plants is between 10am and 2pm in your garden. Goldenrod grows up in the wild areas of my garden if I don’t cut it down through the season. Since I am getting interested in natural dyes, I cut some for a dyepot recently. When I went out with my clippers, there were so many insects buzzing around it that I backed off. I did take some where there was little action going on, but left the rest to the beneficials.

leatherwing on spearmint

Leatherwing on spearmint.

You can also experience all this by letting some of your regular garden plants, such as basil, flower and go to seed. Spearmint, which can take over if you are not careful, attracts many beneficials if you let it flower. I like to have celery come back each year and go to seed. On the way to making seed that I save for culinary use and replanting, the flowers attract an array of good bugs–and all I have to do is watch it happen. Besides the insects you see in these photos, you will see bumblebees, wasps, beetles, spiders, and more in your garden if you allow it to happen.

Assasssin bug babies

Assassin bug babies.

Learn to identify insects you find in your garden so you don’t freak out and destroy the good ones you see that might surprise you, such as the assassin bugs in this photo. I found this young family on my cowpea plants. Although I’ve found ladybugs on other plants, my favorite ladybug photo is one I took on a cowpea plant of a ladybug eating an aphid.

ladybug eating an aphid

Ladybug eating an aphid.

To attract many of these good insects, you need to have permanent plantings. Weedy fencerows can provide  habitat. Not tilling all your garden at once will help, as well as having permanent paths. A border with permanent plantings will provide overwintering habitat. These things will enhance the year-round beauty of your garden and will be less work for you in the long run. The book Great Garden Companions by Sally Jean Cunningham is a good reference to consult if you want help deciding what to plant to attract specific insects to help with certain pests.

Now is a great time to make your 2018 garden plan to ensure that you plant the desired cover crop, considering what your following crop will be, in each bed for next year. I locate my compost piles on my garden beds and rotate them, along with my other crops to contribute to soil fertility. The advantage of that is evident in the crops that follow. Managing your plantings to attract and maintain beneficial insects in your ecosystem will create a garden that is a joy to be in.homeplace earth logo

Read Full Post »

garden clipboard and veggies

I hope you have been making notes from your garden and your kitchen about what you have been growing and eating this summer. Being able to eat as much of a meal as you can from what you have produced is a feeling of accomplishment. Even if you don’t grow everything you eat, supplementing your meals with items from local growers can give you the same good feeling. It is very satisfying to sit down to a meal and know where everything came from and how it was grown.

If you are striving to produce meals with only (or mostly) homegrown ingredients, what would you have to provide, in addition to what you already grow, to make that happen? For example, you could make sure the ingredients for salsa or spaghetti sauce are in your garden plan. In my Homegrown Friday posts you can read how I only consumed what I’d grown for the Fridays in Lent. If you run out of ingredients in your favorite dishes long before next year’s crop comes in, plan now to plant more if space allows.

I know that garden space is at a premium for many and that careful choices need to be made. In that case, think of local growers as an extension of your garden. Whatever they can supply in abundance is something you can take off the list for your garden if you have limited room. You could devote your garden space to the things you love that there is never enough of at the local markets, whether it is sugar snap peas, potatoes, or a special winter squash. Maybe you want to eat from your garden all winter. Those crops need to be planned for, since they will be planted while the traditional summer crops are still in the ground. You will find a three-bed plan for winter eating in my post Winter Food Crop Rotation.

cover crops in late winter

Cover crops in late winter.

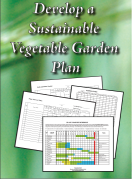
Now is the time to be planning for next year because as the summer crops fade away and space opens up, cover crops need to be planted. Which cover crop to plant in each bed is determined by what crop will follow next year. If you are managing cover crops with hand tools, as I advocate, the cover crops have to be finished before the next crop goes in. By finished I mean winterkilled, cut at the proper time to lie down as mulch or compost material, or harvested at the end of its life cycle. A handout that will help you with cover crop decisions is available as a free download on the resource page on my website. In Grow a Sustainable Diet there are sample garden maps showing how to include cover crops in your rotations, the reasoning behind the cover crop choices, and thoughts on what other choices could be made. Getting cover crops planted this fall is your first step to having a great garden in 2016, as long as they are planned with the next crop in mind.

Mississippi Silver cowpeas ready to harvest for dry beans.

Mississippi Silver cowpeas ready to harvest for dry beans.

Just so you know, the perfect garden plan doesn’t exist. You will always be changing it as new ideas come your way. Also, the weather has a way of encouraging gardeners like us to look at new varieties and new crops to add to our plans. Cowpeas came to be part of my garden after a couple years of serious drought. I put my mind to what grows well in dry times here in the mid-Atlantic region and came up with cowpeas, sometimes known as Southern peas. That first year with the cowpeas was another dry one and they did great. Don’t you know, the following year was the wettest year I have ever experienced. The cowpeas did great then, also, and have been part of my garden ever since. I save seed each year, ensuring I will have adequate seed for next year that is already acclimated to my garden, no matter what the weather brings.

If eating a substantial part of your diet from your garden and local sources is a goal for you, participating in the 10-Day Local Food Challenge can be a gauge to measure how far you have come. The formal challenge is taking place October 1-10, but you could determine any days to be your challenge. The formal challenge suggests you eat food grown within 100 miles for 10 days. Acknowledging that humans have been trading for eons, 10 exotics are allowed to augment your local/homegrown diet. The exotics are things not grown within the 100 mile limit. So, if you really can’t exist without coffee and chocolate you can include them in your exotics while you think about weaning yourself off of them a bit. Maybe you could experiment with herb teas from your garden rather than having another cup of coffee. I don’t have any suggestions for the chocolate other than to experience all the flavors you can from your garden, which will fill your belly and your soul, lessening the need for something like chocolate.homeplace earth

Read Full Post »

Floriani Red Flint and meal (L)-Bloody Butcher and meal (R)

Floriani Red Flint and meal (L)-Bloody Butcher and meal (R)

For some years now, during the Fridays in Lent, I have been only consuming what I’ve grown myself in my garden. You can read about my previous Homegrown Fridays here. I know from experience that this takes some concentration and dedication each Friday that I do this. We usually have something at a meal that comes from our garden or from a farmer we know personally, but limiting the meal to only what I’ve grown means no dairy products, no vinegar on the greens, and no olive oil. Also, this time of year if I’ve run out of potatoes and onions I have to buy them from the grocery store—something I’m not happy with. Last year, in spite of being terrifically busy writing Grow a Sustainable Diet, I kept to the Homegrown Fridays eating only what I had grown. This year I am deep into writing another book—Seed Libraries and other means of keeping seeds in the hands of the people. I really want to keep the momentum going on this newest book and decided to be kinder to myself and not be so distracted on Friday. Also, maybe if I back off a little on my self-imposed rules, others will find it more doable. Last year on my Homegrown Fridays 2013 post I invited comments from anyone who had tried the same thing and had no takers.

I’m still sticking to eating something that I’ve grown at each meal on the Fridays in Lent, unless I’m traveling and eating away from home. This year, however, the meals might also include some other ingredients. The stored staple crops I have available are the same as before—sweet potatoes, cowpeas, corn for cornmeal, garlic, peanuts, and maybe hazelnuts and walnuts. There are also greens from the garden, eggs from the chickens, dried and canned produce, and mead. Check my past Homegrown Fridays for examples of meals from only these ingredients.

This year I have some new additions. We made grape juice from our grapes in 2013. Not a lot, but some to save for Homegrown Friday breakfasts. Breakfast is still by the old rules. I have cornmeal mush cooked in water, rather than milk. The honey I put on it is a gift from my friend Angela’s bees (okay, so I bent the old rules a bit for breakfast since it’s not my honey). Our bees did not survive the winter in 2013 and, being so busy, we didn’t replace them. However, new bees are arriving this week. Yeah!

I tried a new corn in 2013 and find I like the taste a little better than Bloody Butcher. Floriani Red Flint corn didn’t yield as well as my tried-and-true Bloody Butcher that I’ve been growing for more than twenty years, so I’ll be working with it to see what I can do. I’ll be planting both varieties in 2014. When I first planted Bloody Butcher I had also planted a yellow variety that I don’t remember the name of. Bloody Butcher did much better than the yellow corn, so that’s what I stuck with. Since Floriani Red Flint and Bloody Butcher are both red corns, I was surprised at the difference in color when I ground them into cornmeal. You can see in the photo that Floriani Red Flint is yellow and the Bloody Butcher cornmeal is purple, which I was already familiar with.

cowpeas with dried tomatoes and onions

cowpeas with dried tomatoes and onions

Changing the rules gives me the opportunity to tell you about my dried tomatoes in olive oil. When I dry tomatoes in my solar dryers, sometimes there are ones that aren’t quite dry when the rest are. I put the not-quite-dry ones in a jar of olive oil that I keep in the refrigerator, adding tomatoes as I get them. An easy and tasty dish is to sauté a cut-up onion in the olive oil from that jar, along with some of the tomatoes. Add some cooked cowpeas until they’re heated through and there’s lunch. I often refer to those tomatoes as flavor bites and add them to scrambled eggs and quiche.

blessing_130516_A1-198x300If you’ve enjoyed following my Homegrown Fridays, you are going to love reading Blessing the Hands that Feed Us by Vicki Robin. If her name sounds familiar, you may know her as co-author of Your Money or Your Life. I read Blessing the Hands that Feed Us when it came out in January this year and thoroughly enjoyed it. Robin limited her diet to what was grown within 10 miles of her home for a month! It all began when a friend wanted to find someone to feed from her garden for a month and Robin, who refers to sustainability as an extreme sport, offered to give it a try. Before starting on this adventure she put some thought into it and decided to widen her diet to the ten miles to include dairy, eggs, and meat, but the bulk of her meals came from her friend’s garden. She allowed what she referred to as exotics—oil, lemons and limes, salt, a few Indian spices, and caffeine–which enhanced her meals. Giving yourself limits like this doesn’t so much limit you as it does open your heart and mind to so many more issues at hand. If you include exotics, how are the workers responsible for growing them and bringing them to you being treated? How is the soil that grows these things being treated? The food you get from local growers—how is it grown and are the growers getting a fair return for their labor, knowledge, and care? Is the treatment of the soil your food is grown in building the ecosystem for those living nearby and for the earth community at large?

One of the things that Robin brought up in her book was that as we go forth in these changing times we need to be operating out of love and not fear. I talked about that same thing in Grow a Sustainable Diet. Both books also talk about community. We do not live in a vacuum, needing to provide all of our own needs. Yes, on Homegrown Fridays I explore what it would be like if my diet only consisted of what I’d grown myself. I do that to bring my own focus to what is really important to me and examine what I really need. It deepens my appreciation for what I eat all the other days of the year and for the people and the land that supply what I can’t. When Angela gave me that quart of honey last summer, I truly valued it, knowing that my homegrown supply from the previous year would be running out. My Lenten Homegrown Fridays begin the thought process about what it would take to go forth in a peaceful, loving way that treasures all of life.Homeplace Earth

Read Full Post »

4.1 How Much To Grow - BLOGHow Much to Grow is the title of Chapter 4 in Grow a Sustainable Diet. If your garden is small and whatever you get from it is a welcome addition to your table, you might not be concerned with exactly how many pounds are produced of anything. You are just happy to have homegrown food in your meals. If you want to be able to predict how much your harvest will be so you can plan to have a certain amount for your family to eat, you can put pencil to paper now and do some calculating.

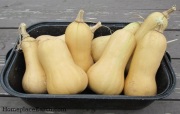
butternut squash

butternut squash

Chapter 4 contains a worksheet (you see part of it here) to help with those calculations. (There is a link in the book that will take you to PDFs of all the worksheets so you can print them out.) Whether you are trying to decide how much to grow for your family or for your CSA, the process is the same. Decide how much you want for each week and how many weeks you will be eating it, or in the case of a CSA, how many weeks you need to put it in the CSA boxes. If you have no idea how many pounds of something you need, go to the grocery store and pick out a reasonable quantity for a meal in the produce department. Weigh it on the scale that is right there. Multiply that weight by how many meals per week that item will supply and you have the pounds needed per week. The number of weeks you want to eat something could be only the weeks it is fresh from the garden, or every week of the year if you are preserving for eating out of season. Rather than the weight, you may need to know the count; how many of something you will have, such as butternut squash. Sometimes you can find that information in the seed catalogs, and sometimes not. From my experience, I know that I can expect about 4 squash per plant. If the catalog doesn’t have that information for the variety you choose, read the description of all the varieties, as well as the specifics for each crop to get an estimate.

Finding out how much is needed is the easy part. You need to know how much you can grow in your area and pounds/100 ft² is a good universal measure to use. How to Grow More Vegetables by John Jeavons has Master Charts that can help you with that. The Master Charts have columns for Biointensive yields and for the US Average for each crop. Use those figures as guidelines. Your yield will depend on many factors, including your soil, climate, and management style. You might already know how much you can harvest in the area planted. If not, this exercise should encourage you to record your harvests this year, at least for the crops you are most interested in.

Mississippi Silver cowpeas

Mississippi Silver cowpeas

Remember the charts are only guidelines. For the Biointensive yield, the Master Charts give three numbers; the beginning yield that you could expect getting at some time, the intermediate yield that could be reached after good soil building, and a high yield that few might reach. The Biointensive yield of winter squash is shown as 50/100/350. There is no US Average shown in the Master Charts, but my research determines that number to be 49.5 pounds/100 ft². The target yield I use for butternut squash is 150 pounds/100 ft². I have reached that yield and sometimes higher in my garden. For cowpeas, the Biointensive yield is 2.4/4/5.9. The US Yield of cowpeas isn’t shown, but through my research I’ve determined it to be 2.6 pounds. I live in a great climate for cowpeas and have found I can use 5 pounds/100 ft² as my target yield. On the other hand, I would love to plan on getting 100 pounds/100 ft² regularly with my potatoes, but the voles keep the yield below that. The Biointensive yield for potatoes is 100/200/780 and the US Average is 84.2. Depending on the variety, I don’t always reach the low Biointensive yield of 100 pounds for tomatoes. The US Average for tomatoes is 67 pounds for fresh and 153.4 pounds for processing tomatoes per 100 ft².

From your garden map you will know how much space you have available. My post Making a Garden Map can help you with that. It becomes a balancing act, deciding how much space to allot for each crop. Having a target yield makes planning easier. Your target yield may need to be adjusted from year to year, but at least you have someplace to start from. Between cover crops and food crops, plan to have your beds full all year. Immediately after your early spring crops are harvested, plant the next crop. Leaving the beds empty is an invitation for Mother Nature to plant her favorites, which we tend to think of as weeds.

The rest of the page of the How Much to Grow worksheet that you don’t see is a space for comments and three columns for the amount of calories, protein, and calcium per pound of food. It is always good to leave space for comments—something about that crop you want to remember. Since I keep records for my certification as a GROW BIOINTENSIVE Sustainable Minifarming teacher, I am interested in the amount of calories, protein, and calcium in each crop. There might be other things that you want to record in those additional columns.

Use this information to enhance what you are doing, but don’t let it overwhelm you. Keep track of what you can. As you find you have more questions, add the appropriate recordkeeping to your system. Most importantly—have fun in your garden this year!Homeplace Earth

Read Full Post »