Feeds:
Posts
Comments

Archive for the ‘nuts’ Category

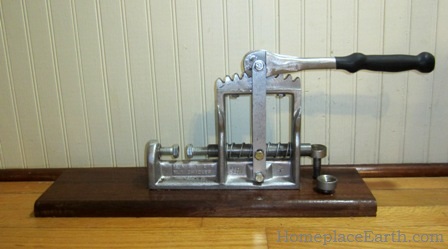
Master Nut Cracker1-BLOG

Master Nut Cracker

                                                                                                                              We have a couple of black walnut trees near our driveway. Until 2008 I had only paid passing attention to them, never taking the time to harvest the nuts at the right time. To do that, every day or two I would have to pick up the green balls that fell from the trees and throw them in the driveway. Driving over them would remove the green husks. Then I would gather the nuts to air-dry and store for later. If they weren’t gathered from the ground in a timely manner, I would find worms in them. Shelling them was a challenge. I tried cracking them using a hammer and by squeezing them in a vice. Both methods were unsatisfactory. You can find information about these methods and more at http://www.nemahaweb.com/blackwalnuts/crackers.htm. Black walnuts are much harder than the English walnuts you would find in the grocery store and regular nutcrackers won’t work for them. Finally I called my friend Margaret to borrow her black walnut cracker.

Margaret and Jerry moved to their 50 acre farm in late 1982. They had black walnut trees in the yard and intended to make use of them. When Margaret told me of her search for a suitable nutcracker, I told her of an article I had recently read in the December 1983 issue of Organic Gardening magazine. I located that issue on my bookshelf while preparing to write this post. It still contained a note to Xerox the article for Margaret. (Back then we didn’t copy things, we Xeroxed them.) The article profiled four nutcrackers suitable for hard-shelled nuts—hickories, butternuts, and black walnuts. The Potter nutcracker was one of them, and the one owned by the authors, Mike and Nancy Bubel.  At the time, I had also checked my copy of Home Food Systems which listed the Potter as the “largest, heaviest, most powerful nutcracker we tested.” Home Food Systems was published in 1981. Margaret bought one and has used it all these years.

Potter nut cracker-BLOG

Margaret’s Potter Nut Cracker

Our black walnut trees seem to bear every other year, so I didn’t throw myself into thinking about black walnuts again until the fall of 2010. The Resilient Gardener by Carol Deppe was hot off the press and the green balls were, once again, raining down. Deppe talks about gathering nuts in her book, specifically the need to get them off the ground promptly. I borrowed Margaret’s Potter nutcracker again. However, the best way to store nuts is in the shell, with the cracking done as needed. It became clear that I should have my own tool. With the harvest skipping a year, there were no new nuts to crack in 2011, but I still had some left from 2010 to play with. I had my eye out for a used Potter, since they aren’t manufactured anymore. What I found is the Master Nut Cracker, similar to the Potter.

My husband gave me a Master Nut Cracker for Christmas last year. It is the one in the top photo and it came with a bag of black walnuts. It was just what I needed for my black walnuts—and as I found later—for the hazelnuts (filberts) and peanuts. My husband had also given me small vice grips to use for the hazelnuts, an improvement over my other methods. I thought my hazelnuts would be too small for the Master Nut Cracker, but I found that it cracked all but the very smallest. Eventually I realized that I could shell peanuts with it, also.

This nut cracker lives up to its expectations for cracking black walnuts. If you see advertisements for nutcrackers, read them carefully. If they list walnuts (rather than black walnuts), they mean English walnuts, which are easier to shell. One of the great things about this nutcracker is that it has a second set of anvils. You can see these in the picture. They’re inserted into their storage holes to the right on the board. Just unscrew the larger anvils and put these in and you’re all set to crack smaller nuts. These smaller anvils are what I put on for the hazelnuts. The anvils are concave, allowing you to crack the shells without smashing everything together, which is what happens using the hammer method.

If you are thinking of getting a Master Nut Cracker, be on the watch for the Duke Nutcracker. The Duke is a Chinese knock-off and of lesser quality, according to what I’ve read. Often Chinese look-alikes are inferior and will soon break or be less than enjoyable to use. Do your internet homework and order from Gerald Gardner, developer of the Master Nut Cracker, himself. You will have to send a check to him and the address is on his website, along with the story of how it all came to be. You might want to put a Master Nut Cracker on your Christmas wish list, like I did. Happy cracking!


More about my experiences with the Master Nut Cracker at http://www.motherearthnews.com/permaculture/master-nut-cracker.aspx
Read Full Post »

Growing Protein--BLOGWhen we think of protein foods we normally think of meat, dairy and eggs. However, we can also get protein from plants. Beans and grains contain the most, but there is some protein in all vegetables. Of course, if you depended on a plant-based diet for your protein, you would be wise to look to the concentrated plant sources for your needs, unless you are eating a really large amount of food.

Protein is used by the body for building and maintaining. It stands to reason if you are pregnant or nursing, or have been injured and need to repair tissue, your protein requirements would be higher than the recommended daily allowance of 46 grams/day for women and 56 grams/day for men. In my last post I talked about growing potatoes for needed calories. Potatoes have 7.7 grams of protein per pound, so if you ate a considerable amount of potatoes, you would also be racking up the protein. Carol Deppe spent a winter eating a lot of potatoes and wrote about it at http://caroldeppe.com/ThePotatoBin.html. On the other hand, if you ate corn and beans for protein, you would get about 40 grams of protein for each pound of corn you ate and over 100 grams per pound of dry beans. In addition to potatoes, Deppe grows her own beans and corn. If you are interested in growing a significant part of your diet, her book The Resilient Gardener needs to be on your reading list. 

Protein is made up of amino acids, many of which can be synthesized by the body, if enough nitrogen (protein) is available. However, there are eight amino acids, referred to as essential amino acids, that need to come from the food we eat. Animal sources have all the essential amino acids and plant sources do not. Interestingly enough, the ones the legumes (peas and beans) are lacking are the ones that the grains have plenty of, and vice versa. There are reasons for the traditional meals such as cornbread and beans, tortillas with beans, and beans and rice. Even peanut butter on whole wheat bread serves to give you the right combination. Beans and grains don’t need to be eaten at the same meal to get the benefit, but they both need to be in your diet somewhere.

Besides protein and calories, including grains in your garden plan provides carbon in the form of stalks and straw for compost making, necessary for feeding the soil without bringing compost materials in. In my garden I have straw from wheat and rye in June and from cornstalks in the fall for compost. Besides the straw from wheat and rye, much organic matter is left in the soil from their decomposing roots. The legumes are soil enriching crops, leaving behind nitrogen for the next crop. The most nitrogen is left in the soil if the legume crop is harvested at flowering, as you would if you were growing it only as a compost crop. After that, nitrogen is put toward producing the beans or peas. Nevertheless, some nitrogen stays behind and it is good to have legumes in your rotation.     

Other protein sources from your garden are peanuts and sunflowers seeds.  I harvest peanuts before the frost kills the vines, hanging them in the barn for the peanuts to dry on the vines. I pick off the peanuts when they are ready. You can see that in my DVD Cover Crops and Compost Crops IN Your Garden. The vines become compost material, but that peanut hay could also feed small livestock. Peanuts and sunflower seeds contain 117.9 and 108.9 grams of protein per pound respectively. These crops also supply needed fat in your diet. In addition, they can be used for cooking oil. More information about that is at my post https://homeplaceearth.wordpress.com/2012/07/10/using-a-piteba-oil-press/. Sunflower stalks, like the cornstalks, are used in the compost. 

In a permaculture garden you might have hazelnut (filbert) trees. Hazelnuts have 57.2 grams of protein per pound. My hazelnuts form a border on the north side of my garden. I wrote about hazelnuts at https://homeplaceearth.wordpress.com/2012/03/20/hazelnuts-filberts-in-my-garden/. Hazelnuts trees can be pruned, with the trimmings feeding your rocket stove. These nuts also provide fat in your diet and can be pressed for oil. 

 Okay, I know you aren’t going to be eating a pound of beans or corn at a meal. In terms more easy to understand, a cup of boiled cowpeas (the beans I grow) has 13.3 grams of protein. I use ½ cup cornmeal, cooked with milk or water for a good-sized serving of cereal. That cornmeal has 5 grams of protein. A thick slice of homemade whole wheat bread has 3.9 grams of protein. A one ounce serving of peanuts has 7.4 grams. By comparison, a cup of milk contains 8 grams of protein and one large egg contains 6.3 grams. 

If you have enough calories in a varied homegrown diet, most likely you are getting enough protein. As you can see, growing grains for compost naturally gives you protein foods. If you were growing a significant part of your diet, you would also be concerned with having enough calcium. That’s the topic for next time.


More about Growing Protein at http://www.motherearthnews.com/permaculture/growing-protein.aspx.

Read Full Post »

Piteba oil press-BLOGOnce you really begin to plan how to eat a homegrown/local diet you will soon realize that cooking oil is something that is not coming out of your garden or is available from local growers, unless you live in California in olive territory. If animal products are in your diet, that could be a source of fat. I buy bacon locally from a farmer who raises his hogs on pasture and save the drippings for cooking with. Having homegrown oil, however, would be nice, and it just happened that I visited Lehman’s Hardware in 2010 when they first began to carry the Piteba oil press. I bought one and played with it long enough to know that I needed to spend more time learning all the ins and outs to put it to the best use. I was busy building my solar dryers and learning more about them, however, so the oilseed press got put aside. With my 2011 hazelnut harvest and homegrown peanuts, I decided it was time to get it out. Another source for the Piteba is Bountiful Gardens.

The photo shows it all set for action. The press comes with a small bottle with a wick that holds colored lamp oil that you provide. The first photo shows blue lamp oil, but in the closeup photo you can’t see colored oil because it is almost empty. You also need to provide a container to catch your pressed oil as it drips from the slot. Unfortunately, a jelly jar is too wide to fit the space, but I have a small juice glass that is just the right size. There is a small hole in the frame where that glass sets. A funnel could be placed there with a tube that leads to a larger container. You also need to provide the seed hopper, made from a soda bottle. I used a bread pan to catch the oilseed cake after it was pressed.

The small lamp heats up the press cage to help with the oil flow. Light it 10 minutes before you begin pressing. Once things are flowing well, you might be able to extinguish it. Beware! Only have the wick showing the slightest bit or the flame will be too big. If it is too big and you have to adjust the wick, DO NOT grab the wick holder with your fingers while it is hot! Wait until it cools. I’m speaking from experience here.

The first time I used my press I tried some old sunflower seeds that I had here. They were the striped culinary ones, not the black oilseed variety that you should use for oil. Being old they were probably somewhat dry and they immediately stopped it up. The handle stopped turning easily, in fact, it became impossible to turn. When that happens, and it will, you need to take off the large cap and the adjustment bolt. If you’ve had the lamp lit, they will be hot, which is why I keep handy a ¾” wrench to use for the adjustment bolt and a monkey wrench for the cap. Take them off and immediately clean out the cap. You will need a knife to dislodge all the packed seed residue. Wash everything thoroughly, making sure the threads of the cap are clean.   If your seeds are too dry, the directions suggest mixing some water with them and leaving them in a plastic bag for two days, then try again.

Immediately after using the Piteba, dismantle and clean it. If you wait, the press cake inside will become hard as stone. If that happens, you can soak everything in water until it softens enough to take apart. Depending on how it is, you may need to leave it soaking overnight, but it will soften enough to clean. Be sure to read all the directions. There is a washer that needs to be coated with edible oil before it goes on the expeller screw when you put it all together to use.

You can go to the health food store and buy any number of seeds to try in the Piteba. There is a performance chart available on the Piteba website that allows you to compare the percent of oil in various seeds. If push came to shove, however, and you needed to provide cooking oil for your household, you would do well to learn as much as you can about using seeds you can grow or find locally. Keep in mind that these seeds aren’t as convenient as the ones from the store. You will need to clean and process them yourself. If you are using sunflower or pumpkin seeds, use oilseed varieties. The seeds of oilseed pumpkins are hulless. The seeds from oilseed varieties of sunflowers are black.

Piteba oil press-closeup-BLOG

pressing homegrown peanuts

I was anxious to press my homegrown hazelnuts and peanuts. It took forever to shell the hazelnuts, since my nuts are the small native variety. Find out more about growing hazelnuts at Hazelnuts / Filberts In My Garden. The yield for one cup of homegrown hazelnuts, weighing 5 ounces, was 3⅓ tablespoons oil. The yield for one cup of homegrown peanuts, weighing 6 ounces, was 4 tablespoons oil. I used my Master Nut Cracker for the shelling for both the hazelnuts and peanuts. The peanuts went pretty fast with that. I’ll be writing about that nut cracker one of these days.

If you wanted to produce enough oil for one tablespoon a day per person, you would need 1.4 gallons of oil per person per year. In the Master Charts in How To Grow More Vegetables (HTGMV) by John Jeavons, the beginning yield for peanuts is 4 pounds per 100 ft² and the intermediate yield is 10 pounds. The average U.S. yield for peanuts is 7.2 pounds per 100 ft². Let’s consider the conservative 4 pound yield. I need to sow about 8 ounces of peanuts for each 100 ft² planting, so a yield of 4 pounds leaves 3.5 pounds for eating or pressing for oil. At that rate it would take 960 ft² to grow peanuts to produce 1.4 gallons of oil, plus the seed to plant back. Just think, if you had that 7.2 pound U.S. average, it would only take 500 ft². I battle the voles at my place, so my best yield of peanuts has been 3.75 lb. per 100 ft². I’ll have to see what I can do to get my peanut yield up. The HTGMV beginning yield for hazelnuts is 7 pounds per 100 ft² planting. Since hazelnut trees are perennial, you don’t have to save out any seed to plant back, however, some trees may not produce every year.

primitive oilseed press-BLOG

primitive oilseed press

In 2008 I took this picture of a primitive oilseed press. I don’t know any more about it than what you see in the picture.The seeds are in a small basket. We were at a folklife festival and came upon it at the end of the day. The only person around was a volunteer who said it was for pressing seeds for oil. If you don’t have a Piteba, it might give you some ideas. In The Self-Sufficient Life and How To Live It, John Seymour suggests using a cider press to extract the oil from seeds. You would need to crush the seeds, then wrap them in a cloth. Obviously, you would need to work with a larger quantity of seeds. It might be, now that you have taken a closer look at what’s involved to produce your cooking oil, you might adjust your diet to use less than before. Steaming vegetables might become more desirable than stir-frying. Last week I used my solar oven to bake some snap beans, potatoes, and garlic together with only 1 tablespoon of my newly pressed oil drizzled over the vegetables. It was delicious.

Read Full Post »

swt potatoesX3, kale, cowpeas--BLOG

sweet potatoes, kale, and cowpeas

Once again, I decided to observe Homegrown Fridays, eating only what I’ve grown on the Fridays in Lent.  Anything you see in bold followed by * is listed on the Recipes page of this blog (click on the recipe tab at the top).  This year was more of a challenge because of other commitments.  I started two weeks early so I could get in seven Fridays and even at that, two of the Fridays were actually Thursdays.  I finished early so that I could be off on another adventure.  If you’re reading this the first week in April, 2012, I’m at Tillers International in Michigan finding out more of what they do there while my husband is taking a class in timber framing.

The delicious dinner you see in the photo was one of my meals.  It consisted of kale harvested fresh from the garden, Arkansas Razorback cowpeas, and three varieties of sweet potatoes–Ginseng, Beauregard, and purple.  When I have no “homegrown only” restrictions, I would probably put butter on the cowpeas and sweet potatoes and vinegar on the kale.  I enjoyed the natural flavors of that food without butter and vinegar. 

polenta with tomato sauce--BLOG

polenta with tomato sauce

I had dried a variety of things in my solar food dryers last summer and had looked forward to using them for Homegrown Fridays this year.  I made a soup using as many of them as I could*.  Dinner one Friday was polenta topped with tomato sauce*.  Cooked Mississippi Silver cowpeas accompanied that meal.  Polenta is just another name for cornmeal mush that has been cooked a little longer and let set to thicken.  I cooked it in a crockpot the day before, then put it in the refrigerator.  At dinnertime I put tomato sauce over it and heated it in the oven.  When I cooked the cornmeal and water for polenta, I added dried onions.  I froze some, which made an easy lunch to heat up on another busy Homegrown Friday.

I was fortunate to have peanuts this year and made peanut butter for the first time in my GrainMaker  mill.  I had better luck grinding raw peanuts than grinding roasted peanuts to make peanut butter.  I made it twice and, although I’m sure I’d get better at it with practice, it’s a whole lot easier, and less cleanup, to just eat the peanuts as they are.  The folks in Biosphere 2 grew peanuts with the intent to press them for oil, but decided to just eat them as a snack.  Peanuts were one of their main sources of fat.  Their two year experiment with eight people living in a completely sealed environment and producing all their food is documented in the book Eating In: From the Field to the Kitchen in Biosphere 2 by Sally Silverstone.  I made peanut butter to have with carrots from the garden.  That day I also made sorghum crackers.  Recalling a recipe for greens in peanut sauce from the cookbook Simply in Season, I made a version of that with my dried collards.  I put peanut butter with the dried collards and water while it cooked.  We ate it as a vegetable for dinner, but I liked it better as a sandwich filling for a meal another day.  It would have made a good dip.  

bean burgers and sorghum breadsticks--BLOG

bean burgers and sorghum breadsticks

I made “bean burgers” for the first time.  It’s something that’s long been on my “to-do” list.  I used cooked cowpeas, reconstituted dried onion and dried sweet pepper, and minced garlic.  The cowpeas were boiled until really soft.  I mashed everything together and made it into patties that I topped with tomato sauce and baked.  Breadsticks made with sorghum flour were served with that.  

One day lunch was home-canned green beans cooked with dried cabbage and onions.  Sorghum patties (made like corn patties*) rounded out that meal.  A couple lunches were sweet potatoes, peanuts, and raisins.  Peanuts, raisins, and popcorn were great to have among my choices of homegrown food.  Last summer I dried grapes for raisins by cutting the grapes in half and drying them in the solar dryers.  The seedless grapes were best for that.  Popcorn was popped in a pan with no oil for a snack some days.  Just be ready to shake the pan a lot to prevent burning.  When limiting your diet like this, it is good to plan for something quick to eat if you are really hungry and you still have to plan dinner.  Peanuts, raisins, and popcorn filled that need nicely and could be taken along if I had to be gone somewhere. 

cornmeal mush with hazelnuts and honey--BLOG

Bloody Butcher cornmeal mush with hazelnuts and honey

Breakfast was the easiest meal and always the same.  I had cornmeal mush made with my Bloody Butcher Corn.  I sweetened it with honey from my bees and added hazelnuts, which were great.  You can read about my hazelnut harvest in my last post.  My black walnut trees seem to bear alternate years and didn’t drop nuts in 2011. The staples in this homegrown diet are cornmeal, sweet potatoes, cowpeas, and greens.  I had sorghum and wheat for additional flour and the dried vegetables were much appreciated, especially tomatoes and onions.  I had some naturally fermented sour pickles and garlic that I chopped up and added to cowpeas for lunch one day.  Herbs, dried and fresh, add diversity to the flavors.  I was happy to harvest fresh celery leaves in the garden.  The parsley I used was dried.  Eating this way makes you really appreciate each additional flavor and texture.  You might be interested in reading about  my 2011 Homegrown Friday experiences.

I drank water or herb tea.  Currently my herb tea blend consists of spearmint, bee balm, lemon balm, and basil.  On these Homegrown Fridays my husband and I often opened a bottle of mead made from our honey and grapes or elderberries.  We feel very fortunate to have such bounty from our garden.  At the same time, we are mindful of those in the world who don’t know where their next meal is coming from.  We hope that our work here will help towards the understanding of what it would take to feed others.  The learning is in the doing.  I hope some of you will try a Homegrown Friday or two at any time of the year.  It is definitely an experience.  

Read Full Post »

hazelnut cluster-closeupp-BLOG

hazelnut cluster near harvest

In the spring of 2007, I planted hazelnut trees on the north border of my garden.  Last fall, a short four years later, I began to harvest the nuts.  Not all the trees were bearing, but enough were so that I could enjoy a nice harvest and work out the details of what to do with them.  There may be a slight difference between hazelnuts and filberts.  One source referred to the varieties native to the U.S. as hazelnuts and the European varieties as filberts, however I’ve seen the words used interchangeably.  For clarity, I’ll just refer to them all as hazelnuts and specify if I mean American or European varieties.  I have seventeen trees each planted 4 feet apart.  The nuts grow in clusters on the trees, as shown in the photo.  It was exciting to watch them develop over the summer.  I had heard that squirrels often take them, so I watched carefully into September.  I didn’t want them to fall to the ground because I was afraid I would lose them.  As the clusters dried on the tree I pulled them off.  If they needed further drying I put them in the solar dryers.  The harvest began October 9.  At first I stored them in baskets in a cool room in the house.  Having them in clusters insured that there would be some air circulation.  Eventually I got around to threshing them out of the clusters by putting them in a pillowcase and hitting it with a stick.  I use that same procedure to separate dried beans from their hulls.  After threshing I stored some hazelnuts in a crock-type “cookie jar” in my pantry. (It came to my kitchen second-hand and actually says “Cookies” on it.)  The rest were put into a pillowcase and hung in the barn to keep safe from mice.

hazelnuts-vicegrips-ruler-BLOG

hazelnuts and vice-grips for shelling

The nuts still need to be shelled before eating.  These hazelnuts are smaller than the shelled nuts you will find in the health food store.  In fact, they were too small to use with a regular nut cracker, so I resorted to using a hammer to crack them open.  That worked, but often I hit too hard and also smashed the nutmeat.  My solution was to use vice-grips (locking pliers).  I could set the screw on the end of the handle so that the pliers would close to just the right space, cracking the shell but not the nutmeat.  At first I borrowed the vice grips from our workshop, even though they were a little big for the job.  Santa brought me a smaller pair that I keep in the kitchen and are dedicated hazelnut crackers.  From the photo you can see that some nuts are much larger than others.  The trees with the largest nuts seemed to have fewer clusters.  There were anywhere from 2-9 nuts in a cluster.  The largest nuts were in the clusters containing 2-5 nuts.

My trees are American hazelnuts, Corylus americana, which are native to the Eastern U.S. and Canada.  Of the hazelnuts you find in the stores, 99% are grown in Oregon and are European varieties.  European hazelnuts are not quite as hardy as C. americana, but produce larger nuts.  They grow well in the Pacific Northwest where they were thought to be safe from the eastern filbert blight…..until they weren’t.  Eastern filbert blight is now in the western states.  As a result, Oregon State University has bred some European hazelnuts that are resistant to blight.  Rutgers University  also has a breeding program for resistant varieties, hoping to bring commercial hazelnut production to the eastern states.

Eastern filbert blight is not a problem with C. americana.  I bought my hazelnuts as seedling trees from the Virginia Department of Forestry, however, a quick online check shows they don’t offer them anymore.  Yes, some of the nuts were quite small, but some are fairly large.  All are tasty.  According to my favorite garden book, How To Grow Fruits and Vegetables by the Organic Method, edited by J.I. Rodale, if you find a native hazelnut tree in the wild that produces large nuts, dig the suckers and grow them out in your garden.  If you have one that you would like to propagate, and not go digging around, you can just bend the sucker to the ground.  Peg it there or put a rock on it, leaving a few inches of the tip sticking out.  Roots will grow and the following year you can dig that new plant to put elsewhere.  It will have the characteristics of the parent plant.  You can also propagate by planting the nuts.  That method will give you about a 70% chance of having the same characteristics as the parent.  I think I will pay attention and try my hand at propagating my more desirable trees by layering the suckers.

hazelnut male female flowers-BLOG

hazelnut male and female flowers

Although you will find both male and female flowers on the same tree, hazelnuts are not self-fertile, so you need to plant at least two trees within 50 ft. of each other for wind pollination.  The male flowers are actually catkins that are more noticeable hanging from the branches.   The female flowers are tiny and can be found growing right along the branch.  You can see both in the photo.  Some varieties of hazelnuts are designated as producers and some are pollinators.  The pollinators will produce nuts, just not as many as the producers.

I chose hazelnuts for my garden border because I wanted something taller than garden plants for a north windbreak. I would have considered putting grapevines there, but it is a wetter area and grapes need a dry spot.  What I read at the time indicated that hazelnuts could stand the wet soil, however in doing research for this post, everything I see says they need a well-drained spot.  They seem to be doing well in my garden and we’ve had a wet year.  I used closer spacing because I was going for a hedgerow.  Orchard plantings, of course, would be further apart. 

hazelnut tree base-BLOG

multiple stems of hazelnut

In permaculture we always think of plantings that can fill multiple niches.  Hazelnuts naturally grow as a shrub with multiple stems.  As they age, more suckers come.  I assume that I will eventually have to prune some of them out.  That will provide basket-making material and fuel for my rocket stove.  Nuts to eat, baskets, fuel, a nice looking border, and a windbreak all from one planting!  Apparently hazelnuts can be pruned to tree form from the beginning, rather than having multiple stemmed shrubs.  You would have to clip out the suckers when they are dormant early on in the life of the tree.  One internet source I read mentioned spraying the suckers with herbicide!  I’d rather learn to manage the hazelnuts as they naturally grow and find uses for extra suckers/stems. In commercial production the tree form is more desirable because it makes machine harvesting easier.  They let the nuts fall to the ground and pick them up with their machines.  That means they need a clean orchard floor.  I don’t even want to think about how they control the vegetation under the trees for the harvesting to go smoothly.  The American hazelnuts, which grow to about 10 ft., are a little shorter than the European varieties.  Mint, clover, and grass grow under my trees.  If the nuts fell to the ground, I would have to go searching for them, unless I kept that area mulched, or put out tarps or old sheets.  The nuts are actually mature before they fall out of the clusters and I found that it was easy to harvest the clusters on the tree as they ripened.  I wonder if easily falling out of the clusters is a desirable trait in the commercial varieties.  I would think so, although not a good trait in my garden.

I hope you add hazelnuts to your permaculture garden.  They are quick to mature, a good addition to your diet, and provide materials for other projects.  My next post on April 3 will be about my Homegrown Fridays this year which have included my own hazelnuts.

Read Full Post »