Feeds:
Posts
Comments

Posts Tagged ‘linum usitatissimum’

Linen Vest 2020 - BLOG

Homegrown Linen Vest

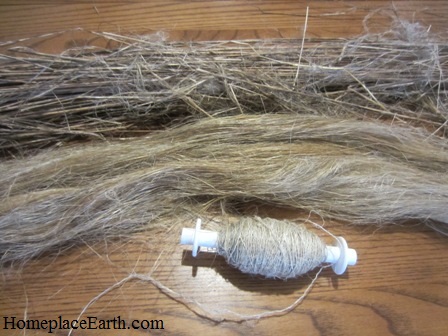
Work with my homegrown fiber, specifically cotton and flax/linen has kept me too busy to post lately, but I wanted to share my most recent project with you–a vest from my homegrown flax (Linum usitatissimum). I grew the flax, processed it, spun it into linen yarn, scoured it, and wove it into fabric for the vest. The processing involves rippling, retting, breaking, scutching, and hackling. I have used my homegrown linen as weft in my weaving before, but this is the first article of clothing where I used it as warp. Warp has to endure abrasion from passing through the heddles on the loom and, since linen is such a hairy fiber, I knew that I would have to address that if I used it for warp. Otherwise those “hairs” would hinder the weaving. I tamed the hairiness by dipping the fiber in a sizing solution that I made from gelatin. There are many versions of sizing you can make yourself. It washes out easily after the cloth comes off the loom. Although I ply cotton before I use it as warp, I used the linen as singles (no ply).The pattern I used is the same one I developed for my cotton vest and you can find the details here. This linen fabric was woven at 12” wide, as was the cotton vest. Since linen does not shrink as much as cotton, I was able to use ⅝” seams rather than the  ¼” that I used for the cotton vest. I wanted to add a bit of color to my vest, so I dyed some of the fiber with my homegrown Japanese indigo and used it for every other warp thread. The color is subtle and you don’t see it as stripes. The other warp threads and the weft is the natural linen color.

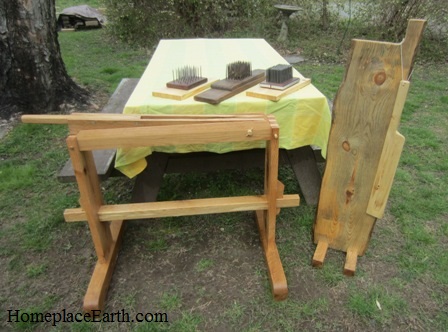
My linen yarn measured 38-45 wpi (wraps per inch). I wove it at 24 epi (warp ends per inch), putting two warps through each space in a 12 dent reed. I wove it on a heavy Nilus 4 harness floor loom. Linen warp needs to be held at a tight tension, which may be harder to achieve with a lighter table loom. It also needs a good shed to separate those hairy fibers. The greater distance from the heddles to the back beam on a floor loom, as compared to a table loom, also helps with that separation. I used 7.5 ounces of homegrown yarn for the warp. or 1,660 yards. The weft required less, since the warp includes loom waste. That was enough for the vest fabric plus the side panels on the lining.

linen vest lining - WEB

intended lining side

I have begun to weave the lining fabric for my garments and wove this lining from my homegrown linen. Rather than spin more flax for the lining, I thought I would use up the leftovers from other projects, knowing that there would be a difference in color. Color differences may occur as a result of different harvests, retting conditions, processing times during scouring, etc. Since I would be the only one seeing the lining, it didn’t really matter. Right?

As you will see, it did matter. The leftover linen yarn that I had  was not enough for all the lining, but I had enough extra outside fabric to make up

linen buttons - BLOG

linen buttons

the difference. I used the outside fabric to make the side panels and one pocket. I didn’t have enough of either fabric for both pockets, so there is one of each. The color difference on the shoulder is from different batches of flax/linen, not dyeing. As I was nearing completion I showed it to friends who said they liked the lining at least as much as the outside, so I made it reversible. For the first time ever I made dorset style buttons. I wrapped my linen around a ½” dowel 30 times to make the core for each button. The loops for closure are made using my linen for a kumihimo braid.Cindy in Cotton Project dress - BLOG The only thing in this vest that I didn’t grow is the cotton thread that I used to sew the fabric pieces together.

Weaving with homegrown yarn is much different than weaving with commercial yarn. I had gotten quite comfortable weaving with my homegrown cotton. Although I love the all-cotton clothes I’ve made, I also love the texture of the fabric I have made with a cotton warp and linen weft. In this photo you can see my cotton warp/linen weft shirt and dress. The color in the dress is supplied by the colored cotton I grew, not dyes. I enjoy challenging myself with these projects. You may not be into producing your own clothes, but I hope you find something you are passionate about. Then jump in and enjoy the adventures that present themselves.2018 Logo

Read Full Post »

flax-straw-spun-thread-on-spindle-a2-2016-blog

Homegrown flax straw, line flax, and linen thread spun from the line flax.

Growing flax in your garden and making it into linen is a great experience. Linen is the name for flax fiber once it is made into thread. It is hard to believe that what you harvest in the summer, something that looks less vibrant than the straw that results from growing wheat and rye, can produce fiber that can be made into fabric. Knowledge and the right tools is all it takes, in addition to planting the flax seeds at the correct time.

The variety of flax you will be planting for linen (Linum usitatissimum) is different than flax for culinary use (Linum perenne). Also, the planting is different. For linen you will need to plant the seeds closer together to get a very thick stand. The goal is to have straight stalks with no branching. A variety of fiber flax that I have found readily available is Marilyn. The Heirloom Seed Project at the Landis Valley Village and Farm Museum in Lancaster, Pennsylvania sells Marilyn flax seed, as does the Hermitage in Pitman, Pennsylvania. Richters in Canada is also a source of flax seed. One pound of flax seed will plant about 300-400 square feet. You might find it for sale in some places by the packet for smaller areas.

Don’t delay in ordering your seeds because the time to plant is in early spring. Last year I planted on March 8 here in Virginia in Zone 7. Using the information in Linda Heinrich’s book, Linen: From Flax Seed to Woven Cloth, as my guide, I waited until the soil had warmed to at least 43-46° F. (6-8° C.). Soil that is too cold will slow germination. Since I was planting in beds in my vegetable garden, I had the required open and sunny space. One guideline as a time to plant is to count back 100 days from when hot weather (80° F., 27° C.) sets in. Here in Virginia it can get hot early, so I went with the soil temperature guideline.

flax-flowering-blog

flax flowers

Harvest time is 90-100 days from planting, or 30 days after the crop is in full flower. I watched for that and marked my calendar for harvest in 30 days. There will be some earlier blooms and some later ones, but watch for the major flush of blooms. I harvested most of my flax on June 22. I let one bed go about two weeks later to let the seeds mature, harvesting that bed on July 8. I thought I would be sacrificing the quality of the fiber if I waited for the seeds to mature, but so far, it looks good. I have processed it into line flax for spinning, but haven’t spun it yet. Time will tell.

I prepare in the fall for my early spring flax planting. The area needs to be moderately fertile. In the fall, instead of planting a cover crop, I cover the intended flax beds with leaves from the oak and maple trees in our yard, since I can never be too sure what the weather will be in early spring and I want the beds ready early. If I could depend on having the cover crop winterkill, I would plant for that. However, sometimes our winters are too mild for a sure winterkill, which has happened this year. I pull off the leaves a week or two before planting to let the soil warm and, when the time is right, put in the seeds.

flax-growing-in-rows-in-the-gardenblog

Flax growing in rows in a 4′ wide garden bed.

Everything I have read about flax cautions about keeping up with the weeding, but I found that was not a problem. The flax was well established by the time weeds appeared. The leaf mulch over the winter might have helped with that. Planting can be done in rows spaced close together (3-4 in., 7.5-10.5 cm.) or broadcast. Planting in rows will help you identify what is flax and what is weeds, making weeding easier. When it is time to harvest, you will be pulling it up, roots and all, rather than cutting it. The fiber extends all the way into the roots and you want every bit.

flax-equipment-blog-brake-hackles-scutching

Flax brake, scutching board and scutching knife, and three hackles. The middle hackle is an antique. We made the other two.

Growing flax is the easy part. Once it is harvested, it will need to be retted, which can be accomplished by soaking it in water or laying it out in the grass to let the dew take care of it for a couple weeks. After that, you will need equipment, which may not be readily available, to process it into line flax to spin. Of course, then you need to spin it, then weave or knit it. Don’t worry, I will be telling you about retting and processing in future posts. We have made a flax brake, scutching board and knife, and hackles to do the processing. The spinning can be done on a handspindle or a spinning wheel.

If you would like to work with flax and you do not intend to grow your own, you can purchase unretted flax from the Heirloom Seed Project at the Landis Valley Museum. That’s how I got started. Places that sell spinning and weaving equipment may have line flax for spinning. The class I took at the John C. Campbell Folk School in 2015 helped jumpstart my flax education.

Get your seeds in the ground this spring and watch for them to flower in 60-70 days, then mark your calendar for harvest 30 days after that. I’ll be posting again before harvest time to guide you along. This will be fun!homeplace earth

Read Full Post »